Suzuki GSX-R 1000 Service Manual: Rear brake caliper disassembly and assembly
Refer to “rear brake caliper removal and installation” .
Disassembly
- Remove the pad spring (1) and rubber boot (2) from the caliper.

- Place a rag over the piston to prevent it from popping out and then force out the piston using compressed air.
| Caution do not use high pressure air to prevent piston damage. |
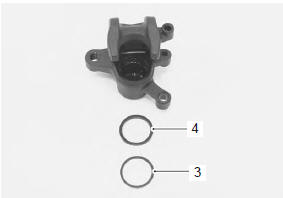
- Remove the dust seal (3) and piston seal (4).
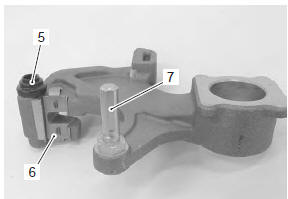
- Remove the rubber boot (5), pad spring (6) and sliding pin b (7) from the bracket.
Assembly
Assemble the caliper in the reverse order of disassembly. Pay attention to the following points:
- wash the caliper bore and piston with specified brake fluid. Particularly wash the dust seal groove and piston seal groove.
Bf: brake fluid (dot 4)
Caution
|

- Apply the brake fluid to dust seal (1).
Bf: brake fluid (dot 4)
- Apply grease to the piston seal (2).
 : Grease 99000–25100 (suzuki
silicone
grease or equivalent)
- Install the piston seal (2) as shown in the figure.
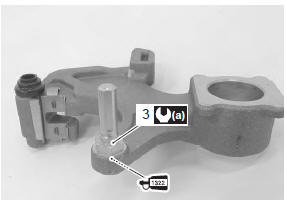
- Apply thread lock to the thread part and install the sliding pin b (3) to the bracket.
: Thread lock cement
99000–32110
(thread lock cement super “1322” or
equivalent)
Tightening torque rear caliper sliding pin b (a): 12 n·m (1.2 Kgf-m, 8.5 Lbf-ft)
- Install the rear brake caliper. Refer to “rear brake caliper removal and installation” .
 Rear brake caliper removal and installation
Removal
Remove the rear wheel. Refer to “rear wheel assembly removal and
installation” in section 2d .
Drain brake fluid. Refer to “brake fluid replacement” in section 4a .
Remo ...
 Rear brake caliper parts inspection
Refer to “rear brake caliper disassembly and assembly” .
Brake caliper cylinder
Inspect the brake caliper cylinder wall for nicks,
scratches or other damage. If any damage is found,
replace the ca ...
Other materials:
Radiator reservoir tank removal and
installation
Removal
Remove the right side cowling. Refer to “exterior parts removal and
installation” in section 9d .
Disconnect the reservoir tank inlet hose (1) from the
reservoir tank (2) and drain the engine coolant.
Remove the reservoir tank (2).
Disconnect the reservoir tank ove ...
Front wheel related parts inspection
Refer to “front wheel assembly removal and installation” .
Tire
Refer to “tire inspection” in section 0b .
Front brake disc
Refer to “front brake disc inspection” in section 4b .
Dust seal
Inspect the lip of dust seals for wear or damage. If any
defects are found, replace the dust seal ...
Ecm / various sensors
Since each component is a high-precision part, great
care should be taken not to apply any severe impacts
during removal and installation.
Be careful not to touch the electrical terminals of the
electronic parts (ecm, etc.). The static electricity from
your body may damage them. ...