Suzuki GSX-R 1000 Service Manual: Brake system inspection
Inspect brake system initially at 1 000 km (600 miles, 2 months) and every 6 000 km (4 000 miles, 12 months) thereafter
Inspect brake hose and brake fluid every 6 000 km (4 000 miles, 12 months)
|
|

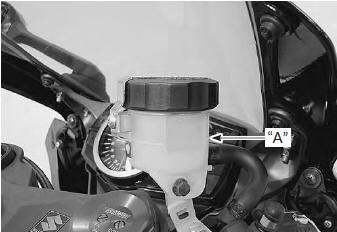
Brake fluid level check
- Keep the motorcycle upright and place the handlebars straight.
- Check the brake fluid level by observing the lower limit line “a” on the front and rear brake fluid reservoirs. When the brake fluid level is below the lower limit line “a”, replenish with brake fluid that meets the following specification.
BF: brake fluid (dot 4)
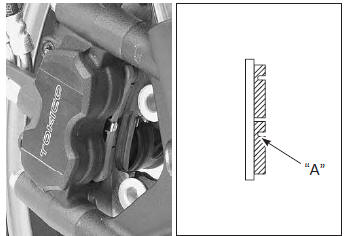
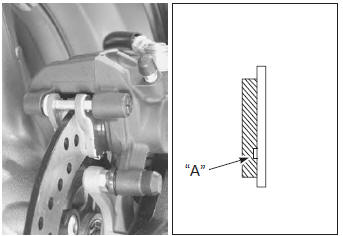
Brake pads check
The extent of brake pad wear can be checked by observing the grooved limit line “a” on the pads. When the wear exceeds the grooved limit line, replace the pads with new ones. Refer to “front brake pad replacement” in section 4b and “rear brake pad replacement” in section 4c .
 Caution Caution
|
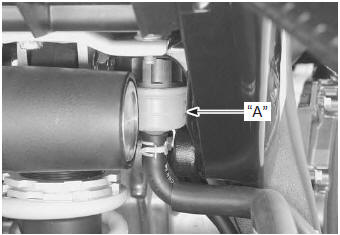
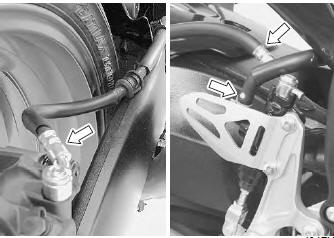
Front and rear brake hose inspection
Inspect the brake hoses and hose joints for crack, damage or brake oil leakage. If any defects are found, replace the brake hose with a new one. Refer to “front brake hose removal and installation” in section 4a and “rear brake hose removal and installation” in section 4a .

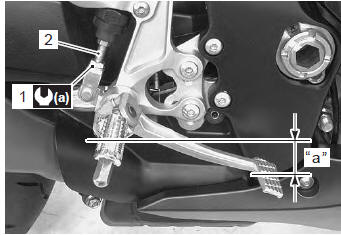
Brake pedal height inspection and adjustment
- Inspect the brake pedal height “a” between the pedal
top face and footrest.
Adjust the brake pedal height if necessary.
Brake pedal height “a” standard: 65 – 75 mm (2.6 – 3.0 In)
- Loosen the lock-nut (1).
- Turn the push rod (2) until the brake pedal becomes 65 – 75 mm (2.6 – 3.0 In) “a” below the top of the footrest.
- Tighten the lock-nut (1) securely.
Tightening torque rear master cylinder rod lock-nut (a): 17 n·m ( 1.7 Kgf-m, 12.5 Lbf-ft)
Brake hose replacement
Replace brake hose every 4 years
Refer to “front brake hose removal and installation” in section 4a and “rear brake hose removal and installation” in section 4a .
Brake fluid replacement
Replace brake fluid every 2 years
Refer to “brake fluid replacement” in section 4a .
Air bleeding from brake fluid circuit
Refer to “air bleeding from brake fluid circuit” in section 4a Rear brake light switch adjustment
Refer to “rear brake light switch inspection and adjustment” in section 4a .
 Drive chain cleaning and lubricating
Clean and lubricate drive chain
every 1 000 km (600 miles)
Clean and lubricate the drive chain in the following
procedures:
clean the drive chain with kerosine. If the drive chain
tends ...
 Tire inspection
Inspect tire
every 6 000 km (4 000 miles, 12 months)
Tire tread condition
Operating the motorcycle with excessively worn tires will
decrease riding stability and consequently invite a
dangerous s ...
Other materials:
Thermostat inspection
Inspect the thermostat in the following procedures:
remove the thermostat. Refer to “thermostat removal and installation” .
Inspect the thermostat pellet for signs of cracking.
Test the thermostat at the bench for control action.
Caution
do not contact ...
Stv actuator removal and installation
Refer to “throttle body disassembly and assembly” in section 1d .
Caution
never remove the stva from the throttle
body.
Isc valve inspection
Refer to “dtc “c40” (p0505 / p0506 / p0507): isc valve circuit malfunction”
in section 1a .
Isc valve removal and installation
Refer t ...
Rear suspension assembly construction
Rear shock absorber mounting bolt (upper)
Rear shock absorber mounting nut (lower)
Cushion rod mounting nut (front)
Cushion rod mounting nut (rear)
Cushion lever mounting nut
Swingarm pivot nut
Swingarm pivot boss nut
Swingarm pivot shaft
Swingarm ...