Suzuki GSX-R 1000 Service Manual: Starter motor removal and installation
Removal
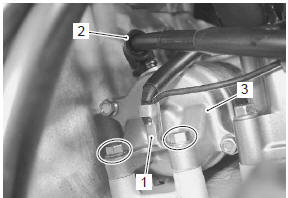
- Turn the ignition switch off and disconnect the battery (–) lead wire (1).
- Lift and support the fuel tank. Refer to “fuel tank removal and installation” in section 1g (page 1g- 9).
- Disconnect the starter motor lead wire (2).
- Remove the starter motor (3).
Installation
Install the starter motor in the reverse order of removal.
Pay attention to the following points:
- apply grease to the o-ring.
 : Grease 99000–25010 (suzuki
super
grease “a” or equivalent)
| Caution replace the o-ring with a new one. |

Install the starter motor. Refer to “wiring harness routing diagram” in section 9a .
 Starter motor components
O-ring
Housing end (inside)
O-ring
Starter motor case
Armature
Housing end (outside)
10
N·m (1.0 Kgf-m, 7.0 Lbf-ft)
4 N·m (0.4
Kgf-m, 3.0 Lbf- ...
 Starter motor disassembly and assembly
Refer to “starter motor removal and installation” .
Disassembly
Disassemble the starter motor as shown in the starter motor components
diagram. Refer to “starter motor components” .
Assembly
Rea ...
Other materials:
Gearshift lever height inspection and
adjustment
Inspect and adjust the gearshift lever height in the
following procedures:
inspect the gearshift lever height “a” between the
lever top and footrest.
Adjust the gearshift lever height if necessary.
Gearshift lever height “a”
standard: 65 – 75 mm (2.6 – 3.0 In)
Loosen the l ...
Fuel pump relay inspection
Refer to “electrical components location” in section 0a .
Inspect the fuel pump relay in the following procedures:
remove the frame covers. Refer to “exterior parts
removal and installation” in section 9d (page 9d-
6).
Remove the fuel pump relay (1).
First, check f ...
Special tools and equipment
Special tool
...