
Suzuki GSX-R 1000 Service Manual: Battery current leakage inspection
Inspect the battery current leakage in the following procedures:
- turn the ignition switch off.
- Remove the front seat. Refer to “exterior parts removal and installation” in section 9d (page 9d- 6).
- Disconnect the battery (–) lead wire.
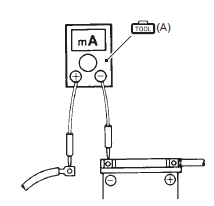
- Measure the current between battery (–) terminal and the battery (–) lead wire using the multi-circuit tester. If the reading exceeds the specified value, leakage is evident.
Caution
|
Special tool
 (a): 09900–25008 (multi circuit
tester set)
Tester knob indication
current (  , 20 ma)
Battery current (leak) under 3 ma
- Connect the battery (–) terminal and install the front seat. Refer to “battery removal and installation” and “exterior parts removal and installation” in section 9d .

 Regulated voltage inspection
Inspect the regulated voltage in the following
procedures:
remove the front seat. Refer to “exterior parts
removal and installation” in section 9d (page 9d-
6).
Start the engine ...
Other materials:
Know your limits
Always ride within the boundaries
of your own skills. Knowing these
limits and staying within them will
help you avoid accidents.
A major cause of accidents involving
only a motorcycle (and no
cars) is going too fast through a
turn. Before entering a turn, select
an appropriately low corne ...
Drive chain inspection and adjustment
Inspect drive chain
initially at 1 000 km (600 miles, 2 months) and every
6 000 km (4 000 miles, 12 months) thereafter
Drive chain visual check
With the transmission in neutral, support the
motorcycle using a jack and turn the rear wheel
slowly by hand.
Visually check the drive chain fo ...
Tire pressure and loading
Proper tire pressure and proper
tire loading are important factors.
Overloading your tires can lead to
tire failure and loss of vehicle control.
Check tire pressure each day
before you ride, and be sure the
pressure is correct for the vehicle
load according to the table below.
Tire pre ...