Suzuki GSX-R 1000 Service Manual: Cam chain tension adjuster inspection
The cam chain tension adjuster is maintained to proper tension automatically.
- Remove the cam chain tension adjuster. Refer to “engine top side disassembly” .
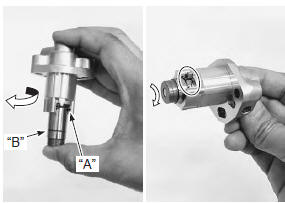
- Holding the cam chain tension adjuster as shown in the figure, compress the plunger by turning the adjuster body until the outer circlip “a” reaches the groove “b”.
- Hook the outer circlip “a” into the groove “b”, then turn the plunger head clockwise more than 90° to make a little play in the inner thread mechanism.
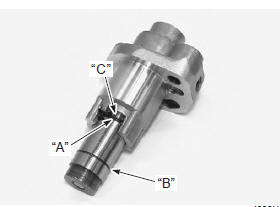
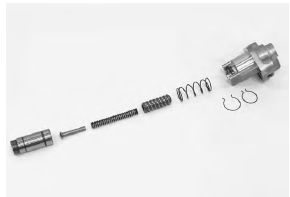
| Note if it is difficult to compress the plunger because of internal engine oil, disassemble the adjuster by releasing the inner circlip “c” and spill out the oil. |
| Caution do not turn the adjuster body until the outer circlip “a” exceeds the groove “b”. If the inner circlip “c” is caught in the groove “b”, plunger may not go out automatically from the adjuster body even if pushing force is applied on the head. In such case, it needs to be disassembled. |
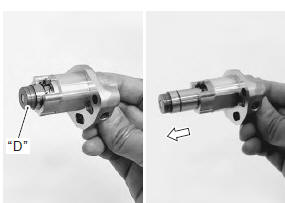
- Check that the plunger goes out automatically when its head “d” is tapped. If it does not work smoothly, replace the cam chain tension adjuster with a new one.
- Install the cam chain tension adjuster. Refer to “engine top side assembly” .
 Camshaft sprocket
Inspect the camshaft sprocket in the following
procedures:
remove the intake and exhaust camshafts. Refer to “engine top side
disassembly” .
Inspect the teeth of each camshaft sp ...
 Cam chain guide / cam chain tensioner
removal and installation
Cam chain guide / cam chain tensioner
removal and installation
Removal
Remove the cylinder head cover. Refer to “engine top side disassembly” .
Remove the cam chain guide no. 2 (1).
Remove the cylinder head. Refer to “engine top side disasse ...
Other materials:
Accessory use
The addition of unsuitable accessories
can lead to unsafe operating
conditions. It is not possible
for suzuki to test each accessory
on the market or combinations of
all the available accessories; however,
your dealer can assist you in
selecting quality accessories and
installing them correc ...
Rear brake light switch inspection
Inspect the rear brake light switch in the following
procedures:
lift and support the fuel tank. Refer to “fuel tank
removal and installation” in section 1g (page 1g-
9).
Disconnect the rear brake light switch lead wire
coupler (1).
Inspect the rear brake light swi ...
Maintenance schedule
It is very important to inspect and
maintain your motorcycle regularly.
Follow the guidelines in the
chart. The intervals between periodic
services in kilometers, miles
and months are shown. At the
end of each interval, be sure to
perlorm the maintenance listed.
Warning
Improper ...