Suzuki GSX-R 1000 Service Manual: Cylinder inspection
Refer to “engine top side disassembly” .
Refer to “engine top side assembly” .
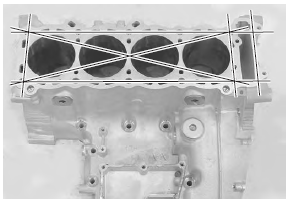
Cylinder distortion
Check the gasket surface of the cylinder for distortion.
Use a straightedge and thickness gauge. Take clearance readings at several places. If any reading exceeds the service limit, replace the crankcase set.
Special tool : 09900–20803 (thickness gauge)
Cylinder distortion service limit: 0.02 Mm (0.0008 In)

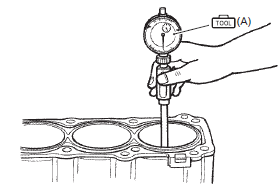
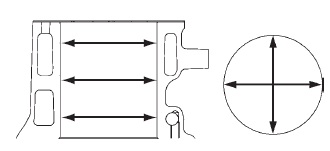
Cylinder bore
Measure the cylinder bore diameter at six places. If any one of the measurements exceed the limit, overhaul the cylinder and replace the piston with an oversize piston.
The remaining cylinders must also be rebored accordingly; otherwise, the imbalance might cause excessive vibration.
Special tool (a): 09900–20530 (cylinder gauge set)
Cylinder bore standard: 74.500 – 74.515 Mm (2.9331 – 2.9337 In)


Piston-to-cylinder clearance
Refer to “piston and piston ring inspection” (page 1d- 71).
 Engine bottom side assembly
Assemble the engine bottom side in the reverse order of
disassembly. Pay attention to the following points:
Note
apply engine oil to each running and sliding
part before reassembling.
...
 Piston ring removal and installation
Removal
Remove the piston. Refer to “engine bottom side disassembly” .
Carefully spread the ring opening with your thumbs
and then push up the opposite side of the 1st ring to
remove i ...
Other materials:
Fuel and oil recommendation
Fuel (for USA and Canada)
Use only unleaded gasoline of at least 90 pump octane
(r/2 + m/2).
Gasoline containing mtbe (meltyl tertiary butyl ether),
less than 10% ethanol, or less than 5% methanol with
appropriate cosolvents and corrosion inhibitor is
permissible.
Fuel (for other countries) ...
Ignition switch removal and installation
Removal
Remove the air cleaner box. Refer to “air cleaner box removal and
installation” in section 1d .
Disconnect the ignition switch lead wire coupler (1).
Disconnect the immobilizer lead wire coupler (2).
(For e-02, 19, 24, 51)
Remove the harness clamp (3).
...
Rear turn signal light removal and installation
Removal
Remove the frame cover assembly. Refer to “exterior parts removal and
installation” in section 9d .
Remove the rear combination light. Refer to “rear combination light
removal and installation” .
Disconnect the lead wire coupler (1).
(Lh: white, rh: black)
&nb ...
