
Suzuki GSX-R 1000 Service Manual: DTC “c49” (p1656): pair control solenoid valve circuit malfunction
Detected condition and possible cause
|
Detected condition |
Possible cause |
| Pair control solenoid valve voltage is not input to ecm |
|
Wiring diagram
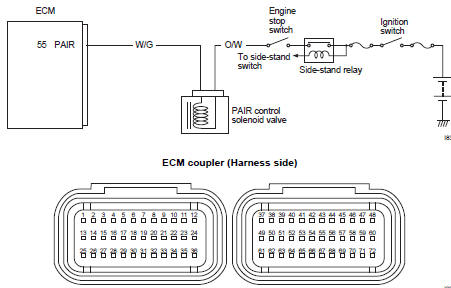
Troubleshooting
| Caution when using the multi-circuit tester, do not strongly touch the terminal of the ecm coupler with a needle pointed tester probe to prevent terminal damage. |
| Note after repairing the trouble, clear the dtc using sds tool. Refer to “use of sds diagnosis reset procedures” . |
|
Step |
Action |
Yes |
No |
|
1 |
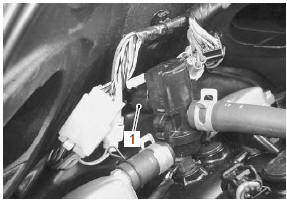
Special tool Tester knob indication resistance (Ω) Pair control solenoid valve resistance 20 – 24 Ω at 20 – 30 °c (68 – 86 °f) (terminal – terminal)
Is the resistance ok? |
Go to step 2. | Replace the pair control solenoid valve with a new one. Refer to “pair control solenoid valve removal and installation” in section 1b . |
|
2 |
Special tool Tester knob indication
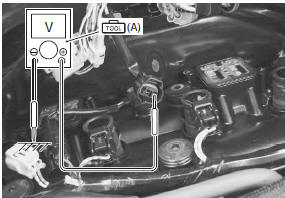
voltage ( Pair control solenoid valve voltage battery voltage ((+) terminal: o/w – (–) terminal: ground)
Is the voltage ok? |
|
Open or short circuit in the o/w wire. |
 (a): 09900–25008 (multi
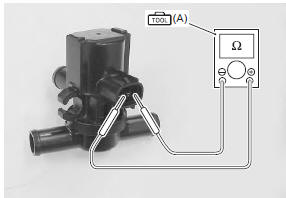
 )
)
Active control inspection
- Set up the sds tool. (Refer to sds operation manual for further details.)
- Turn the ignition switch on.
- Click “pair sol operating control” (1).
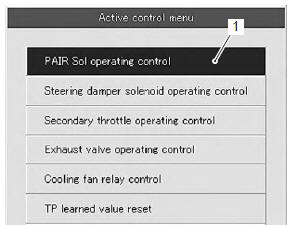
- Click each button (2). At this time, if an operating sound is heard from the pair control solenoid valve, the function is normal.

 DTC “c46” (p1657-h/l or p1658): excv
actuator circuit malfunction
DTC “c46” (p1657-h/l or p1658): excv
actuator circuit malfunction
Detected condition
Possible cause
C46
The operation signal does not reach the
excv actuator.
Excva position sensor voltage low or
high
0.14 V ≤ Sensor v ...
 DTC “c60” (p0480): cooling fan relay
circuit malfunction
DTC “c60” (p0480): cooling fan relay
circuit malfunction
Detected condition and possible cause
Detected condition
Possible cause
Cooling fan relay signal is not input to ecm.
Cooling fan relay circuit open or short.
...
Other materials:
Balancer shaft journal bearing inspection
and selection
Refer to “engine bottom side disassembly” (page 1d-
49).
Refer to “engine bottom side assembly” .
Inspection
Inspect the bearing surfaces for any signs of fusion,
pitting, burn or flaws. If any, replace them with a
specified set of bearings.
Selection
Place the plastigauge axial ...
Wheel balance check and adjustment
Check and adjust the wheel balance in the following
procedures:
removal the wheel assembly. Refer to “front wheel assembly removal and
installation” and “rear wheel assembly removal and installation” .
Remove the mounting drum from the rear wheel.
(For rear wheel) ref ...
Cam chain guide / cam chain tensioner
removal and installation
Removal
Remove the cylinder head cover. Refer to “engine top side disassembly” .
Remove the cam chain guide no. 2 (1).
Remove the cylinder head. Refer to “engine top side disassembly”
and “engine bottom side disassembly” .
Remove the starter clutch. Refer to “s ...