Suzuki GSX-R 1000 Service Manual: Exhaust control valve inspection
Inspect exhaust control valve initially at 1 000 km (600 miles, 2 months) and every 12 000 km (7 500 miles, 24 months) thereafter
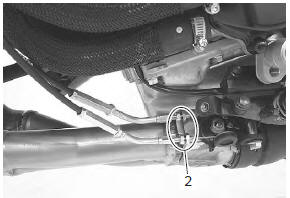
Inspect exhaust control valve as follows:
- remove the left side cowling. Refer to “exterior parts removal and installation” in section 9d .
- Check the exhaust control valve actuator (1) for its smooth movement when the ignition switch is turned on. If the exhaust valve actuator does not move smoothly, check exhaust valve actuator electrical circuit. Refer to “excva inspection” in section 1k .
- Check the lock-nuts (2) for tightness. If the lock-nuts (2) are loose, tighten them after adjusting the cable length. Refer to “excv cable removal and installation” in section 1k .
 Exhaust pipe bolt and muffler bolt inspection
Tighten exhaust pipe bolts and muffler bolts
initially at 1 000 km (600 miles, 2 months) and every
12 000 km (7 500 miles, 24 months) thereafter
Check the exhaust pipe bolts and muffler bolts to th ...
 Valve clearance inspection and adjustment
Inspect valve clearance
initially every 24 000 km (14 500 miles, 48 months)
Inspection
Valve clearance adjustment must be checked and
adjusted, a) at the time of periodic inspection, b) when
the ...
Other materials:
Evaporative emission control system
diagram (only for e-33)
Fuel tank
Fuel-vapor separator
Fuel pump
Fuel feed hose
Fuel shut-off valve
Iap sensor
Surge hose
Evap canister
Purge hose
Evap system purge control solenoid valve
Fue
Hc vapor
Fresh air
Vacuum
...
Washing the motorcycle
When washing the motorcycle,
follow the instructions below:
Remove dirt and mud from the
motorcycle with running water.
You may use a soft sponge or
brush. Do not use hard materials
which can scratch the
paint.
Wash the entire motorcycle
with a mild detergent or car
...
Clutch installation
Install the primary driven gear assembly (1).
Caution
if it is difficult to install the primary driven
gear, rotate the crankshaft.
Be sure to engage the oil pump drive
sprocket with the primary driven gear.
Install the spacer (2) and bea ...