Suzuki GSX-R 1000 Service Manual: Valve clearance inspection and adjustment
Inspect valve clearance initially every 24 000 km (14 500 miles, 48 months)
Inspection
Valve clearance adjustment must be checked and adjusted, a) at the time of periodic inspection, b) when the valve mechanism is serviced, and c) when the camshafts are removed for servicing.
- Lift and support the fuel tank. Refer to “fuel tank removal and installation” in section 1g (page 1g- 9).
- Remove the air cleaner box. Refer to “air cleaner box removal and installation” in section 1d .
- Remove the cylinder head cover. Refer to “engine top side disassembly” in section 1d .
- Remove the spark plugs. Refer to “ignition coil and spark plug removal and installation” in section 1h .
Valve clearance (when cold) in: 0.08 – 0.18 Mm (0.003 – 0.007 In) ex: 0.18 – 0.28 Mm (0.007 – 0.011 In)
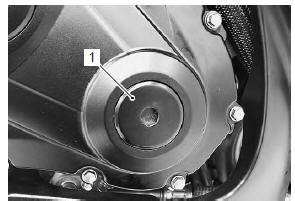
- remove the valve timing inspection cap (1).
Note
|
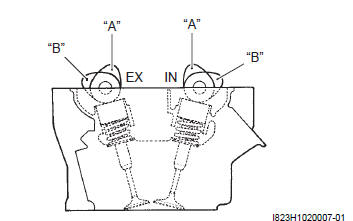
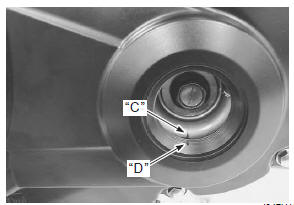
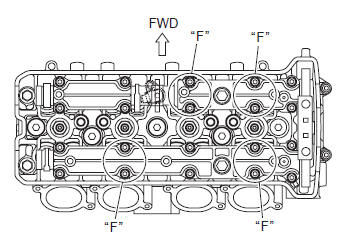
- Turn the crankshaft to bring the line “c” on the ckp sensor rotor to the slit “d” of cap hole thread and also to bring the notches “e” on the left ends of both camshafts (ex and in) to the positions as shown.
- In this condition, read the valve clearance at the valves “f” (in and ex of no. 4 Cylinder, ex of no. 3 And in of no. 2). If the clearance is out of specification, adjust the clearance.
Special tool
 : 09900–20803 (thickness gauge)
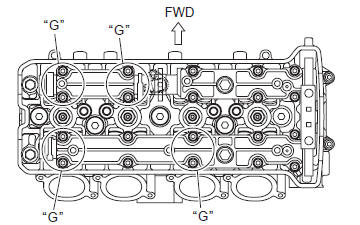
- Turn the crankshaft 360° degrees (one rotation) to bring the line on the ckp sensor rotor to the rib behind the clutch cover and also to bring the notches “e” to the position as shown.
- Read the clearance at the rest of the valves “g” and adjust the clearance if necessary.

Adjustment
The clearance is adjusted by replacing the existing tappet shim with a thicker or thinner shim.
- Remove the intake or exhaust camshaft. Refer to “engine top side disassembly” in section 1d .
- Remove the tappet (1) and shim (2) by fingers or magnetic hand.
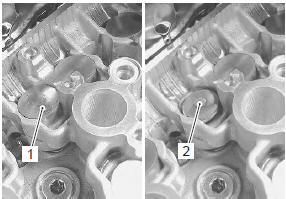
- Check the figures printed on the shim. These figures indicate the thickness of the shim, as illustrated.
- Select a replacement shim that will provide a clearance within the specified range. For the purpose of this adjustment, a total of 21 sizes of tappet shim are available ranging from 1.20 To 2.20 Mm in steps of 0.05 Mm.
- Fit the selected shim (2) to the valve stem end, with numbers toward tappet. Be sure to check shim size with micrometer to ensure its size.
Note
|
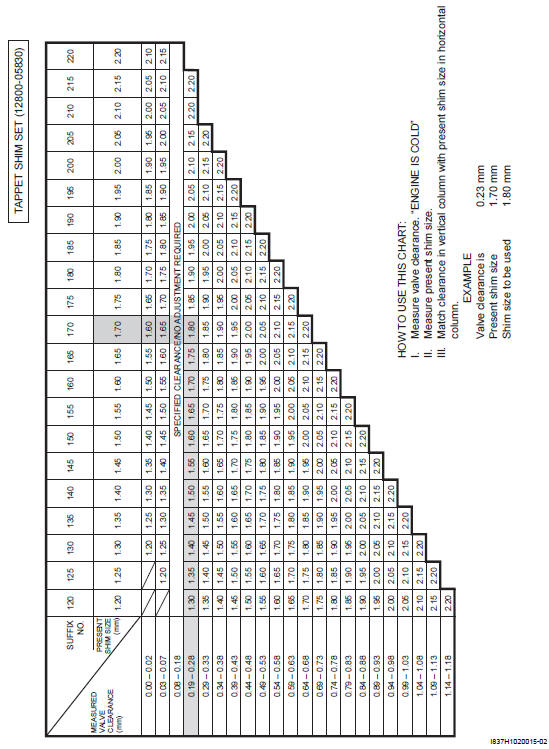
(Intake side)
Tappet shim selection table [intake] tappet shim no. (12892-05C00-xxx)
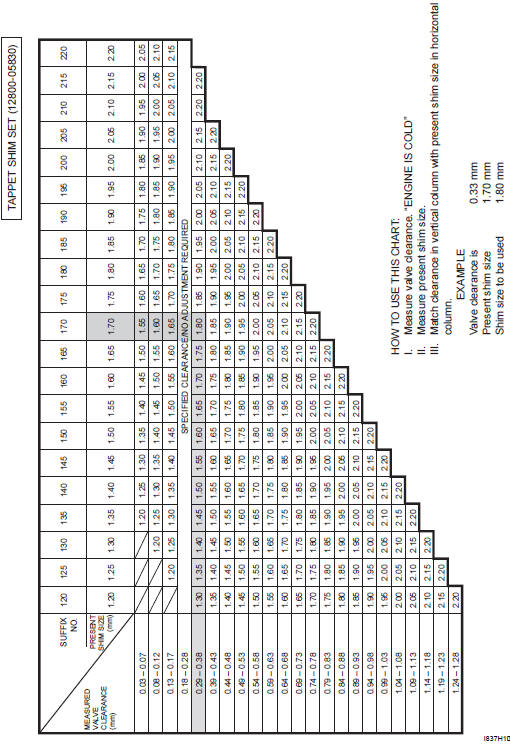
(Exhaust side)
Tappet shim selection table [exhaust] tappet shim no. (12892-05C00-xxx)
- Install the camshafts and cam chain tension adjuster.
Refer to “engine top side assembly” in section 1d .
- Rotate the engine so that the tappet is depressed fully. This will squeeze out oil trapped between the shim and the tappet that could cause an incorrect measurement, then check the clearance again to confirm that it is within the specified range.
- After finishing the tappet clearance adjustment, reinstall the removed parts. Refer to “engine top side assembly” in section 1d .
Spark plug replacement
Replace spark plug every 12 000 km (7 500 miles, 24 months)
Refer to “ignition coil and spark plug removal and installation” in section 1h .
 Exhaust control valve inspection
Inspect exhaust control valve
initially at 1 000 km (600 miles, 2 months) and every
12 000 km (7 500 miles, 24 months) thereafter
Inspect exhaust control valve as follows:
remove the left ...
 Spark plug inspection and cleaning
Inspect spark plug
every 6 000 km (4 000 miles, 12 months)
Heat range
Remove the spark plugs. Refer to “ignition coil and spark plug removal
and installation” in section 1h .
Check sp ...
Other materials:
Service data
Valve + guide
unit: mm (in
Camshaft + cylinder head
unit: mm (in
Cylinder + piston + piston ring
unit: mm (in)
Conrod + crankshaft
unit: mm (in)
Balancer
unit: mm (in)
Throttle body
...
Turn signal / side-stand relay removal and
installation
Removal
Turn the ignition switch off.
Remove the frame cover assembly. Refer to “exterior parts removal and
installation” in section 9d .
Remove the turn signal/side-stand relay (1).
Installation
Install the turn signal/side-stand relay in the reverse
order of removal ...
Specifications
Service data
Clutch
unit: mm (in)
Tightening torque specifications
Note
the specified tightening torque is described in the following.
“Clutch control system components” “clutch components”
Reference: for the tightening torque of fastener not specified in this ...