Suzuki GSX-R 1000 Service Manual: Spark plug inspection and cleaning
Inspect spark plug every 6 000 km (4 000 miles, 12 months)
Heat range
- Remove the spark plugs. Refer to “ignition coil and spark plug removal and installation” in section 1h .
- Check spark plug heat range by observing electrode color. If the electrode of the spark plug is wet appearing or dark color, replace the spark plug with hotter type one. If it is white or glazed appearing, replace the spark plug with colder type one.
Heat range

- After finishing the spark plug inspection, reinstall the removed parts.
Tightening torque
Spark plug gap spark plug: 11 n·m (1.1 Kgf-m, 8.0 Lbf-ft)
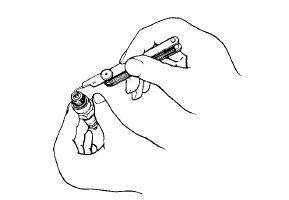
- Remove the spark plugs. Refer to “ignition coil and spark plug removal and installation” in section 1h .
- Measure the spark plug gap using a wire gauge. If it is not within the specification, replace the spark plug.
 Caution Caution
|
Spark plug gap 0.8 – 0.9 Mm (0.031 – 0.035 In)
- After finishing the spark plug inspection, reinstall the removed parts.
Tightening torque spark plug: 11 n·m (1.1 Kgf-m, 8.0 Lbf-ft)
Electrodes condition
- Remove the spark plugs. Refer to “ignition coil and spark plug removal and installation” in section 1h .
- Check the worn or burnt condition of the electrodes.
If it is extremely worn or burnt, replace the spark plug. And also replace the spark plug if it has a broken insulator, or damaged thread.
| Caution
|
- After finishing the spark plug inspection, reinstall the removed parts.
Tightening torque spark plug: 11 n·m (1.1 Kgf-m, 8.0 Lbf-ft)
 Valve clearance inspection and adjustment
Inspect valve clearance
initially every 24 000 km (14 500 miles, 48 months)
Inspection
Valve clearance adjustment must be checked and
adjusted, a) at the time of periodic inspection, b) when
the ...
 Fuel line inspection
Inspect fuel line
every 6 000 km (4 000 miles, 12 months)
Inspect the fuel line in the following procedures:
lift and support the fuel tank. Refer to “fuel tank
removal and installation” ...
Other materials:
Wiring harness routing diagram
Wiring harness no. 2
Tapping clamp
: insert the clamp from the front side. Place the turn signal
and position light couplers in front of the clamp.
Steel clamp
: clamp the wiring harness at the blue taping point. Bend
the steel clamps to the front side.
...
Ignition system check
Remove the spark plugs and
reattach them to the spark
plug caps.
Put the engine stop switch in
the "" position and ignition
switch in the "on" position.
While holding a spark plug
with its base firmly against the
engine, push the electric
starter butt ...
Exterior parts construction
Upper cowling bracket
: set the punch mark to the front and upper side.
Rear view mirror cushion
: set the dent side to inside.
To frame
To headlight assembly
To sprocket cove
To side-stand bracket
...