Suzuki GSX-R 1000 Service Manual: Open circuit check
Possible causes for the open circuit are as follows. As the cause can exist in the connector/coupler or terminal, they need to be checked carefully.
- Loose connection of connector/coupler.
- Poor contact of terminal (due to dirt, corrosion or rust, poor contact tension, entry of foreign object etc.).
- Wire harness being open.
- Poor terminal-to-wire connection.
When checking system circuits including an electronic control unit such as ecm, etc., It is important to perform careful check, starting with items which are easier to check.
- Disconnect the negative (–) cable from the battery.
- Check each connector/coupler at both ends of the circuit being checked for loose connection. Also check for condition of the coupler lock if equipped.

|
- Using a test male terminal, check the female
terminals of the circuit being checked for contact
tension.
Check each terminal visually for poor contact (possibly caused by dirt, corrosion, rust, entry of foreign object, etc.). At the same time, check to make sure that each terminal is fully inserted in the coupler and locked.
If contact tension is not enough, rectify the contact to increase tension or replace. The terminals must be clean and free of any foreign material which could impede proper terminal contact.
|
- Using continuity inspect or voltage check procedure
as described below, inspect the wire harness
terminals for open circuit and poor connection.
Locate abnormality, if any.
|
 Battery
Battery connection in reverse polarity is strictly
prohibited. Such a wrong connection will damage the
components of the fi system instantly when reverse
power is applied.
Removing ...
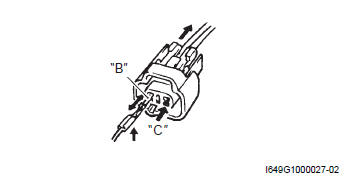
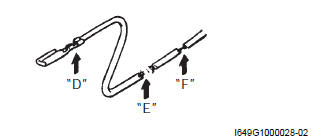
 Continuity check
Measure resistance across coupler “b” (between “a”
and “c” in figure).
If no continuity is indicated (infinity or over limit), the
circuit is open between terminals “a” and “c”.
Dis ...
Other materials:
Drive mode selector description
Engine power characteristics can be changed in 3
modes by operating the drive mode selector to meet
various riding conditions and rider’s preference.
Operation
Drive mode is preset at a-mode when the ignition switch
and engine stop switch are turned on. Follow the
procedure below to operat ...
Throttle body construction
Intake pipe
Evap system purge control solenoid valve
(e-33 only)
Evap canister (e-33 only)
Iat sensor
Isc valve hose
Ho2 sensor
Face
the clamp end left side.
Yellow
marking should face upward.
Face the
end of clamps upward and ke ...
Water pump components
Impeller
Mechanical seal
Oil seal
O-ring
O-ring
8
N·m (0.8 Kgf-n, 6.0 Ib-ft)
10 N·m
(1.0 Kgf-n, 7.0 Ib-ft)
6 N·m (0.6
Kgf-n, 4.5 Ib-ft)
13 N·m
(1.3 Kgf-n, 9.5 Ib-ft)
Apply grease.
Apply engine coolant.
Apply molyb ...