
Suzuki GSX-R 1000 Service Manual: Rear brake disc removal and installation
Removal
- Remove the rear wheel assembly. Refer to “rear wheel assembly removal and installation” in section 2d .
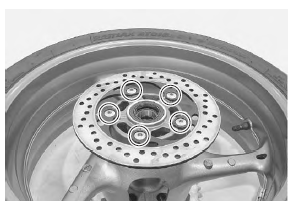
- Remove the rear brake disc.
Installation
Install the rear brake disc in the reverse order of removal. Pay attention to the following points:
- make sure that the brake disc is clean and free of any grease.
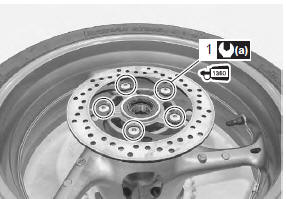
- Apply thread lock to the brake disc bolts (1) and tighten them to the specified torque.
 : Thread lock cement
99000–32130
(thread lock cement super “1360” or
equivalent)
Tightening torque brake disc bolt (rear) (a): 35 n·m (3.5 Kgf-m, 25.5 Lbf-ft)
 Rear brake caliper parts inspection
Refer to “rear brake caliper disassembly and assembly” .
Brake caliper cylinder
Inspect the brake caliper cylinder wall for nicks,
scratches or other damage. If any damage is found,
replace the ca ...
 Rear brake disc inspection
Brake disc thickness
Check the brake disc for damage or cracks and measure
the thickness using the micrometer.
Replace the brake disc if the thickness is less than the
service limit or if defect ...
Other materials:
Sprocket mounting drum dust seal / bearing removal and installation
Removal
Remove the rear wheel assembly. Refer to “rear wheel assembly removal
and installation” in section 2d .
Remove the rear sprocket mounting drum assembly
(1). Refer to “rear sprocket / rear sprocket
mounting drum removal and installation” (page 3a-
3).
Remove the ...
Excv cable removal and installation
Removal
Turn the ignition switch off.
Remove the front seat. Refer to “exterior parts
removal and installation” in section 9d (page 9d-
6).
Remove the left side cowling. Refer to “exterior parts removal and
installation” in section 9d .
Connect the special tool (mo ...
Water pump removal and installation
Removal
Note
before draining engine oil and engine coolant, inspect engine oil and
coolant leakage between the water pump and crankcase. If engine oil is
leaking, visually inspect the oil seal and o-ring. If engine coolant is
leaking, visually inspect the mechanical seal and s ...