Suzuki GSX-R 1000 Service Manual: Starter torque limiter inspection
Removal
- Remove the clutch cover. Refer to “clutch removal” in section 5c .
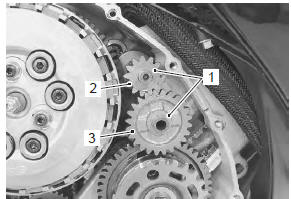
- Remove the washers (1), starter idle gear no. 1 (2) And no. 2 (3).
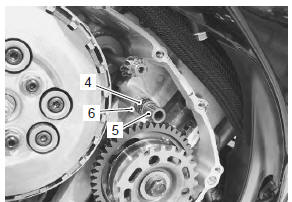
- Remove the starter idle gear no. 2 Bearing (4), shaft (5) and washer (6).
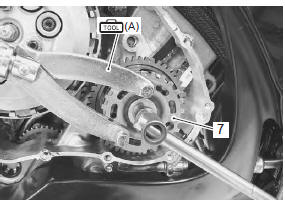
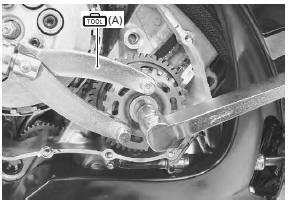
- Hold the starter clutch with the special tool and remove the starter clutch bolt.
| Caution make sure that the pawls of the special tool are inserted into the holes of the starter clutch. |
Special tool
 (a): 09930–40113 (flywheel rotor
holder)
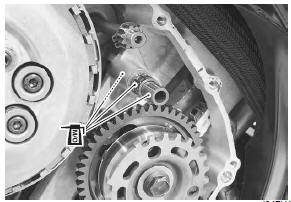
- Remove the ckp sensor rotor (7) and starter clutch assembly.
Installation
Installation is in the reverse order of removal. Pay attention to the following points:
- install the washer (1) to the crankshaft.
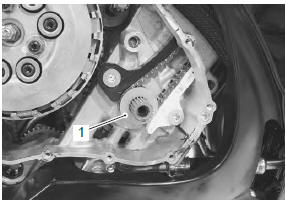
- When installing the starter clutch and ckp sensor rotor, align the wide spline tooth of them with that of crankshaft.
- Hold the starter clutch with the special tool and tighten the starter clutch bolt to the specified torque.
Special tool
 (a): 09930–40113 (flywheel rotor
holder)
Tightening torque starter clutch bolt: 54 n·m (5.4 Kgf-m, 39.0 Lbf-ft)
- Apply molybdenum oil solution to the starter idle gear no. 2 Bearing, shaft and shaft hole.
M/o: molybdenum oil (molybdenum oil solution)
 Starter torque limiter removal and
installation
Starter torque limiter removal and
installation
Removal
Remove the clutch assembly. Refer to “clutch removal” in section 5c .
Remove the washer (1), starter idle gear no. 1 (2)
And starter torque limiter (3).
Installation
Inst ...
 Starter clutch inspection
Refer to “starter clutch removal and installation” .
Starter clutch
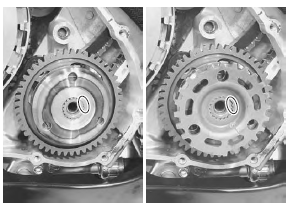
Install the starter driven gear onto the starter clutch.
Turn the starter driven gear by hand to inspect the
starter ...
Other materials:
Windshield cleaning
Clean the windshield with soft
cloth and warm water with mild
detergent. If scratched, polish
with a commercially available
plastic polish. Replace the windshield
if it becomes scratched or
discolored so as to obstruct view.
When replacing the windshield,
use suzuki replacement windshield. ...
Front brake components
Seal set
Piston and seal set
Brake pad spring
Brake pad set
Front brake disc
7.5
N·m (0.75 Kgf-m, 5.5 Lbf-ft)
15 N·m (1.5
Kgf-m, 11.0 Lbf-ft)
39 N·m (3.9
Kgf-m, 28.0 Lbf-ft)
18 N·m (1.8
Kgf-m, 13.0 Lbf-ft)
Apply thread lo ...
Clutch adjustment
Clutch cable play should be 1 0 -
15 mm (0.4 - 0.6 In) measured at
the clutch lever end. Adjust clutch
cable play according to the following
procedure:
Minor adjustment
Turn the clutch cable adjuster 1
to provide the specified play.
Major adjustment
Turn in the adjuster 1 all the ...