Suzuki GSX-R 1000 Service Manual: Front brake light switch inspection
Inspect the front brake light switch in the following procedures:
- disconnect the front brake light switch coupler (1).
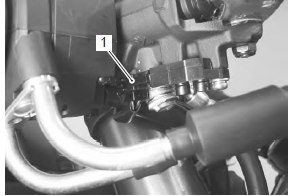
- Inspect the front brake light switch for continuity with
the tester.
If any abnormality is found, replace the front brake light switch with a new one. Refer to “front brake master cylinder / brake lever disassembly and assembly” .
Special tool
 : 09900–25008 (multi circuit
tester set)
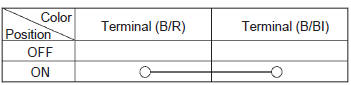
Tester knob indication
continuity ( )
)
- Connect the front brake light switch coupler.
 Repair instructions
Brake pedal height inspection and
adjustment
Refer to “brake system inspection” in section 0b . ...
 Rear brake light switch inspection
Inspect the rear brake light switch in the following
procedures:
lift and support the fuel tank. Refer to “fuel tank
removal and installation” in section 1g (page 1g-
9).
Discon ...
Other materials:
Water pump removal and installation
Removal
Note
before draining engine oil and engine coolant, inspect engine oil and
coolant leakage between the water pump and crankcase. If engine oil is
leaking, visually inspect the oil seal and o-ring. If engine coolant is
leaking, visually inspect the mechanical seal and s ...
Exterior parts construction
Upper cowling bracket
: set the punch mark to the front and upper side.
Rear view mirror cushion
: set the dent side to inside.
To frame
To headlight assembly
To sprocket cove
To side-stand bracket
...
Air cleaner element removal and installation
Removal
Lift and support the fuel tank. Refer to “fuel tank
removal and installation” in section 1g (page 1g-
9).
Remove the air cleaner box cover (1).
Remove the air cleaner element (2).
Installation
Installation is in the reverse order of removal. ...