Suzuki GSX-R 1000 Service Manual: Front wheel assembly removal and installation
Removal
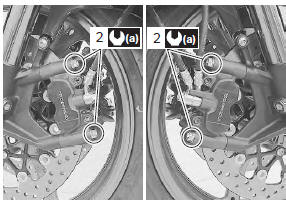
- Remove the brake calipers, left and right.
| Caution do not operate the brake lever with the caliper removed. |
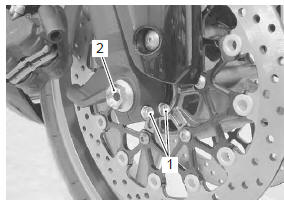
- Loosen two axle pinch bolts (1) on the right front fork leg.
- Remove the front axle bolt (2).
- Raise the front wheel off the ground and support the motorcycle with a jack or a wooden block.
| Caution do not carry out the work with the motorcycle resting on the side-stand. Do not support the motorcycle with the exhaust pipes. Make sure that the motorcycle is supported securely. |
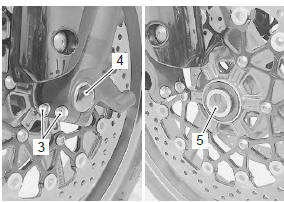
- Loosen two axle pinch bolts (3) on the left front fork leg.
- Draw out the front axle (4) and remove the front wheel.
- Remove the collar (5) (rh only).
| Note after removing the front wheel, fit the calipers temporarily to the original positions. |
Installation
- Install the collar (1) to the right side of the wheel.
 The directional
|
- Insert the front axle from the left side and tighten the front axle bolt temporarily.
- Tighten the brake caliper mounting bolts (2) to the specified torque.
Tightening torque front brake caliper mounting bolt (a): 39 n·m ( 3.9 Kgf-m, 28.0 Lbf-ft)
 After remounting
|
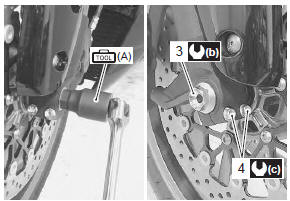
- Hold the front axle with the special tool and tighten the front axle bolt (3) to the specified torque.
Special tool
 (a): 09900–18740 (hexagon socket
(24
mm))
Tightening torque front axle bolt (b): 100 n·m (10.0 Kgf-m, 72.5 Lbfft)
- Tighten two axle pinch bolts (4) on the right fork leg to the specified torque.
Tightening torque front axle pinch bolt (c): 23 n·m (2.3 Kgf-m, 16.5 Lbf-ft)
- Move the front forks up and down 4 or 5 times
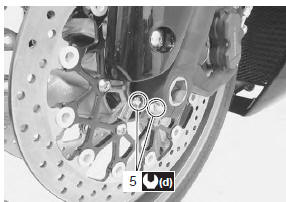
- Tighten two axle pinch bolts (5) on the left front fork leg to the specified torque.
Tightening torque front axle pinch bolt (d): 23 n·m (2.3 Kgf-m, 16.5 Lbf-ft)
 Front wheel assembly construction
Brake disc bolt
Brake caliper mounting bolt
Front axle bolt
Front axle pinch bolt
Clearance
18 N·m (1.8 Kgf-m,
13.0 Lbf-ft)
39 N·m
(3.9 Kgf-m ...
 Front wheel related parts inspection
Refer to “front wheel assembly removal and installation” .
Tire
Refer to “tire inspection” in section 0b .
Front brake disc
Refer to “front brake disc inspection” in section 4b .
Dust seal
...
Other materials:
License plate light removal and installation
Removal
Remove the frame cover. Refer to “exterior parts
removal and installation” in section 9d (page 9d-
6).
Disconnect the license plate light coupler (1).
Remove the nuts.
Remove the license plate light assembly (2).
Installation
Install the license pl ...
Water pump disassembly and assembly
Refer to “water pump removal and installation” .
Disassembly
Remove the air bleeder bolt (1) if necessary.
Remove the water pump case screws.
Remove the o-ring (2).
Hold the impeller (3) with water pump pliers and
remove the impeller securing bolt (4).
Remove t ...
Exhaust control system operation
The excs is operated by the signal supplied from the ecm. The open/close
operation of the excv is performed by
the excva which is controlled by the ecm by changing the current direction of
the actuator motor. The position
sensor (incorporated in the excva) detects the excva movement by measuri ...