Suzuki GSX-R 1000 Service Manual: Rear shock absorber bearing removal and installation
Removal
- Remove the rear shock absorber. Refer to “rear shock absorber removal and installation” .
- Remove the spacer (1).

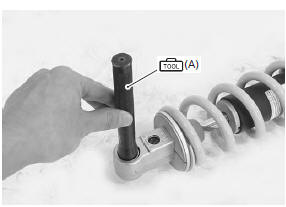
- Remove the rear shock absorber bearing with the special tool.
Special tool
 (a): 09943–88211 (pinion bearing
installer)
Installation
| Caution the removed bearing must be replaced with a new one. |
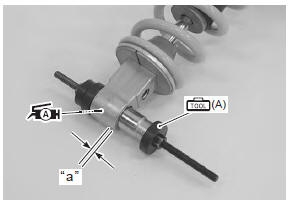
- Press the bearing into the rear shock absorber at 0.5 Mm (0.02 In) depth “a” from the rear shock absorber side surface with the special tool and suitable size socket wrench.
| Note apply a small quantity of the grease to housing when installing the bearing. |
 : Grease 99000–25010 (suzuki
super
grease “a” or equivalent)
Special tool
 (a): 09924–84521 (bearing installer
set)
|
- Apply grease to the bearing.
: Grease 99000–25010 (suzuki super grease “a” or equivalent)
- Install the rear shock absorber. Refer to “rear shock absorber removal and installation” .
 Rear shock absorber inspection
Refer to “rear shock absorber removal and installation” .
Shock absorber
Inspect the rear shock absorber for damage and oil
leakage, and absorber bushing for wear and damage. If
any defect is foun ...
 Rear shock absorber adjustment
After installing the rear suspension, adjust the spring
pre-load and damping force as follows:
Spring pre-load adjustment
The set length 179.3 Mm (7.06 In) provides the
maximum spring pre-load ...
Other materials:
Vehicle identification number
The frame serial number or V.I.N. (Vehicle identification
number) “a” is stamped on the right side of the steering
head tube. The engine serial number “b” is located on
the lower crankcase. These numbers are required
especially for registering the machine and ordering
spare parts.
...
Engine assembly removal
Before taking the engine out of the frame, wash the
engine using a steam cleaner. Engine removal is
sequentially explained in the following steps:
remove the side cowlings. Refer to “exterior parts
removal and installation” in section 9d (page 9d-
6).
Remove the front seat. R ...
Rear brake caliper parts inspection
Refer to “rear brake caliper disassembly and assembly” .
Brake caliper cylinder
Inspect the brake caliper cylinder wall for nicks,
scratches or other damage. If any damage is found,
replace the caliper with a new one.
Brake caliper piston
Inspect the brake caliper piston surface for any
s ...