Suzuki GSX-R 1000 Service Manual: Rear wheel assembly removal and installation
Removal
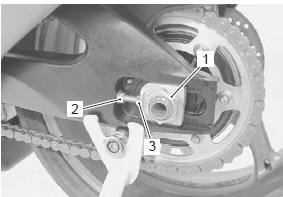
- Loosen the axle nut (1).
- Raise the rear wheel off the ground and support the motorcycle with a jack or wooden block.
| Caution make sure that the motorcycle is supported securely. |
- Remove the axle nut (1).
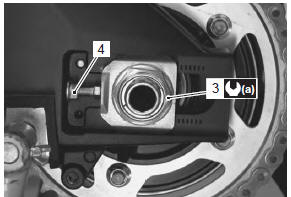
- Loosen the left and right lock-nuts (2) and turn in the adjuster bolts (3).
- Draw out the rear axle.
- Remove the rear wheel by disengaging the drive chain.
| Caution do not operate the rear brake pedal with the rear wheel removed. |
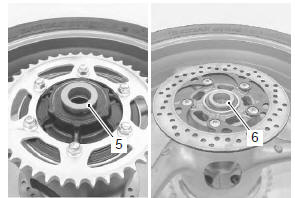
- Remove the collars (5) and (6).
Installation
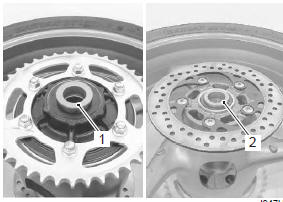
- Install the collars (1) and (2).
- Remount the rear wheel and rear axle, tighten the rear axle nut (3) temporarily.
- Adjust the chain slack after installing the rear wheel.
Refer to “drive chain inspection and adjustment” in section 0b .
- Tighten the rear axle nut (3) to the specified torque.
Tightening torque rear axle nut (a): 100 n·m (10.0 Kgf-m, 72.5 Lbfft)
 After remounting
|
- Tighten both chain adjuster lock-nut (4) securely.
 Rear wheel assembly construction
Rear sprocket nut
Rear axle nut
Brake disc bolt
Clearance
60 N·m (6.0 Kgf-m,
43.0 Lbf-ft)
100 N·m
(10 kgf-m, 72.5 Lbf-ft)
35 N·m
(3.5 Kg ...
 Rear wheel related parts inspection
Refer to “rear wheel assembly removal and installation” .
Tire
Refer to “tire inspection” in section 0b .
Rear brake disc
Refer to “rear brake disc inspection” in section 4c .
Wheel damper
...
Other materials:
Rear brake components
Rear brake caliper
Piston seal
Dust seal
Piston
Rear caliper bracket
Rear brake pad set
Rear brake disc
Brake pad spring
6
N·m (0.6 Kgf-m, 4.5 Lbf-ft)
27 N·m
(2.7 Kgf-m, 19.5 Lbf-ft)
12 N·m
(1.2 Kgf-m, 8.5 Lbf-ft)
17 N·m ...
Engine coolant temperature indicator light inspection
Inspect the engine coolant temperature meter and indicator light (led) in the
following procedures:
remove the left side cowling. Refer to “exterior parts removal and
installation” in section 9d .
Disconnect the ect sensor coupler (1).
Connect a variable resistor (2) ...
Gearshift shaft oil seal / bearing removal and installation
Removal
Remove the gearshift shaft. Refer to “gearshift shaft / gearshift cam
plate removal and installation” .
Remove the gearshift shaft oil seal (1).
Remove the bearings (2) and (3) with the special
tools.
Special tool
(a): 09921–20210 (bearing remover
(12
mm))
...