Suzuki GSX-R 1000 Service Manual: Rear wheel related parts inspection
Refer to “rear wheel assembly removal and installation” .
Tire
Refer to “tire inspection” in section 0b .
Rear brake disc
Refer to “rear brake disc inspection” in section 4c .
Wheel damper
Refer to “drive chain related parts inspection” in section 3a .
Sprocket
Refer to “drive chain related components” in section 3a .
Dust seal
Inspect the dust seal lip for wear or damage. If any defects is found, replace the dust seal with a new one.
Refer to “rear wheel dust seal / bearing removal and installation” .
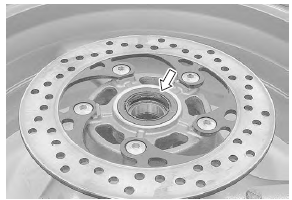
Wheel axle
Using a dial gauge, check the wheel axle for runout, if the runout exceeds the limit, replace the axle shaft.
Wheel axle runout service limit: 0.25 Mm (0.010 In)
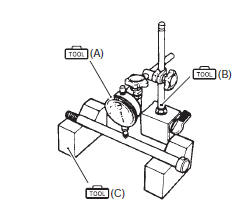
Special tool
 (a): 09900–20607 (dial gauge)
 (b): 09900–20701 (dial gauge
chuck)
 (c): 09900–21304 (v blocks)
Wheel
- Remove the rear brake pads. Refer to “rear brake pad replacement” in section 4c .
- Make sure that the wheel runout checked as shown in the figure does not exceed the service limit. An excessive runout is usually due to worn or loosened wheel bearings and can be reduced by replacing the bearings. If bearing replacement fails to reduce the runout, replace the wheel.
Wheel rim runout service limit (axial and radial): 2.0 Mm (0.08 In)
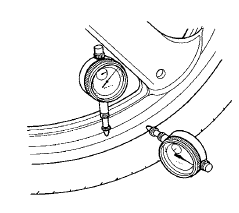
- Install the rear brake pads. Refer to “rear brake pad replacement” in section 4c .
Bearing
Inspect the play of the wheel bearings by hand while they are in the wheel. Rotate the inner race by hand to inspect for abnormal noise and smooth rotation. Replace the bearing if there is anything unusual. Refer to “rear wheel dust seal / bearing removal and installation” .

 Rear wheel assembly removal and installation
Removal
Loosen the axle nut (1).
Raise the rear wheel off the ground and support the
motorcycle with a jack or wooden block.
Caution
make sure that the motorcycle is support ...
 Rear wheel dust seal / bearing removal and installation
Removal
Remove the rear wheel assembly. Refer to “rear wheel assembly removal
and installation” .
Remove the rear sprocket mounting drum assembly
(1) from the rear wheel.
Re ...
Other materials:
Valve clearance inspection and adjustment
Inspect valve clearance
initially every 24 000 km (14 500 miles, 48 months)
Inspection
Valve clearance adjustment must be checked and
adjusted, a) at the time of periodic inspection, b) when
the valve mechanism is serviced, and c) when the
camshafts are removed for servicing.
Lift an ...
Fuel pump inspection
Turn the ignition switch on and check that the fuel pump
operates for a few seconds.
If the fuel pump motor does not make operating sound, inspect the fuel pump
circuit connections or inspect the fuel pump relay and to sensor. Refer to “fuel
pump relay inspection” and “dtc “c23” (p1651 ...
Crankshaft thrust clearance inspection and
selection
Refer to “engine bottom side disassembly” (page 1d-
49).
Refer to “engine bottom side assembly” .
Inspection
With the crankshaft’s right-side and left-side thrust
bearings inserted into the upper crankcase.
Measure the thrust clearance “a” between the leftside
thrust bearing and ...