Suzuki GSX-R 1000 Service Manual: Radiator inspection and cleaning
Radiator hose inspection
Refer to “cooling system inspection” in section 0b .
Radiator inspection
Inspect the radiator for water leaks. If any defects are found, replace the radiator with a new one.
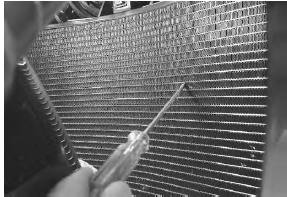
If the fins are bent or dented, repair them by carefully straightening them with the blade of a small screwdriver.
Radiator cleaning
Blow out any foreign matter that is stuck in the radiator fins using compressed air.
Caution
|
- Remove the inner under cowlings. Refer to “exterior parts removal and installation” in section 9d .
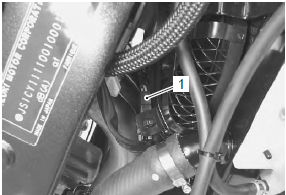
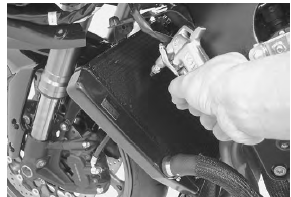
- Disconnect the cooling fan motor lead wire coupler (1).
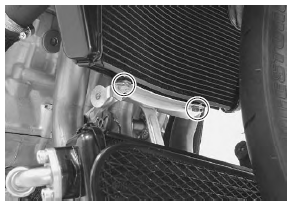
- Remove the oil cooler (2) from the bracket.

- Remove the radiator mounting bolts.
- Move the radiator forward.
- Apply compressed air from the engine side.
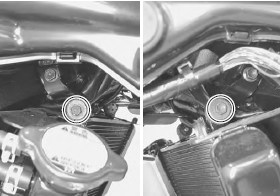
- Tighten the upper radiator mounting bolts.
- Apply thread lock to the radiator bracket bolts and tighten all bolts securely.
 : Thread lock cement
99000–32110
(thread lock cement super “1322” or
equivalent)
- Apply thread lock to the oil cooler bolts and tighten them securely.
 : Thread lock cement
99000–32110
(thread lock cement super “1322” or
equivalent)

- Reinstall the removed parts.
 Radiator cap inspection
Inspect the radiator cap in the following procedures:
remove the radiator cap. Refer to “cooling circuit inspection” .
Attach the radiator cap (1) to the radiator tester (2)
as sho ...
 Radiator / cooling fan motor removal and
installation
Radiator / cooling fan motor removal and
installation
Removal
Remove the inner under cowlings. Refer to “exterior parts removal and
installation” in section 9d .
Drain engine coolant. Refer to “cooling system inspection” in section
0b . ...
Other materials:
Brakes
This motorcycle has front and
rear disk brakes.
Warning
Failure to inspect and properly
maintain the brakes increases
your chance of having an accident.
Inspect the brake system
before each use according to
the inspection before
riding section. Follow the
maintenance ...
Handlebar components
Throttle grip
Grip rubber
Right handlebar switch box
Left handlebar switch box
Right handlebar
Left handlebar
Handlebar expander
Handlebar balancer
Apply handle grip bond.
23
N·m (2.3 Kgf-m, 16.5 Lbf-ft)
5.5 N·m
(0.55 Kgf-m, 4.0 L ...
Water pump related parts inspection
Refer to “water pump disassembly and assembly” .
Mechanical seal
Visually inspect the mechanical seal for damage, with
particular attention given to the sealing face.
Replace the mechanical seal that shows indications of
leakage.
Oil seal
Visually inspect the oil seal for damage, with p ...