Suzuki GSX-R 1000 Service Manual: Starter motor disassembly and assembly
Refer to “starter motor removal and installation” .
Disassembly
Disassemble the starter motor as shown in the starter motor components diagram. Refer to “starter motor components” .
Assembly
Reassemble the starter motor in the reverse order of removal. Pay attention to the following points:
| Caution replace the o-rings with new ones to prevent oil leakage and moisture. |
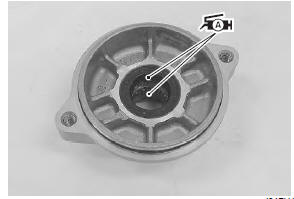
Apply grease to the bearing and lip of the oil seal.
 : Grease 99000–25010 (suzuki
super
grease “a” or equivalent)
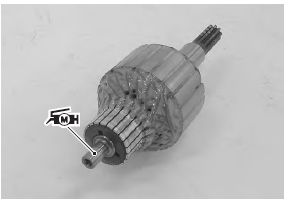
- Apply a small quantity of moly paste to the armature shaft.
: Moly paste 99000–25140 (suzuki moly paste or equivalent)
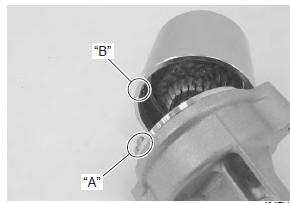
- Fit the depression “a” on the housing end to the projection “b” on the case.
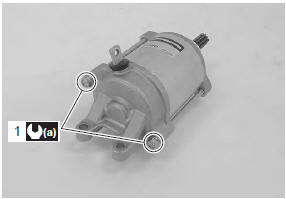
- Tighten the starter motor housing bolts (1) to the specified torque.
Tightening torque starter motor housing bolt (a): 5 n·m (0.5 Kgf-m, 3.5 Lbf-ft)
 Starter motor removal and installation
Removal
Turn the ignition switch off and disconnect the
battery (–) lead wire (1).
Lift and support the fuel tank. Refer to “fuel tank
removal and installation” in section 1g (page 1g- ...
 Starter motor inspection
Refer to “starter motor disassembly and assembly” .
Carbon brush
Inspect the carbon brushes for abnormal wear, cracks or
smoothness in the brush holder.
If either carbon brush is defective, repl ...
Other materials:
Inspecting the drive chain
When inspecting the chain, look
for the following:
loose pins
damaged rollers
dry or rusted links
kinked or binding links
excessive wear
improper chain adjustment
If you find anything wrong with the
drive chain condition or adjustment,
correct the pr ...
Spring pre-load adjustment
To change the spring pre-load,
turn the adjuster 1 clockwise or
counterclockwise. Turning the
adjuster clockwise will increase
the spring pre-load. Turning the
adjuster counterclockwise will
decrease the spring pre-load.
There are five grooved lines on
the side of the adjuster 1 for re ...
Front brake pad replacement
Loosen the pad mounting pins (1).
Remove the brake caliper by removing the caliper
mounting bolts (2).
Remove the pad mounting pins (1), brake pads and
spring.
Caution
do not operate the brake lever while the pads
are removed.
Note
when ...