Suzuki GSX-R 1000 Service Manual: Starter relay inspection
Inspect the starter relay in the following procedures:
- remove the starter relay. Refer to “starter relay removal and installation” .
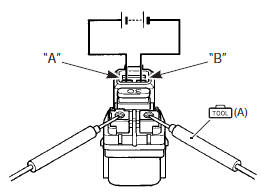
- Apply 12 v to “a” and “b” terminals and check for continuity between the positive and negative terminals using the multi-circuit tester. If the starter relay clicks and continuity is found, the relay is ok.
| Caution do not apply battery voltage to the starter relay for five seconds and more, since the relay coil may overheat and get damaged. |
Special tool
 (a): 09900–25008 (multi circuit
tester set)
Tester knob indication
continuity test (  )
)
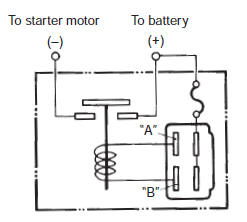
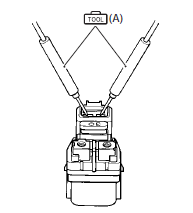
- Measure the relay coil resistance between the terminals using the multi-circuit tester. If the resistance is not within the specified value, replace the starter relay with a new one.
Special tool
(a): 09900–25008 (multi circuit
tester set)
Starter relay resistance 3 – 6 Ω
- Install the starter relay. Refer to “starter relay removal and installation” .
 Starter relay removal and installation
Removal
Turn the ignition switch off.
Remove the front seat. Refer to “exterior parts
removal and installation” in section 9d (page 9d-
6).
Disconnect the battery (–) lead wire ...
 Turn signal / side-stand relay removal and
installation
Turn signal / side-stand relay removal and
installation
Removal
Turn the ignition switch off.
Remove the frame cover assembly. Refer to “exterior parts removal and
installation” in section 9d .
Remove the turn signal/side-stand relay ...
Other materials:
Riding on hills
When climbing steep hills, the
motorcycle may begin to slow
down and show lack of power.
At this point you should shift to
a lower gear so that the engine
will again be operating in its
normal power range. Shift rapidly
to prevent the motorcycle
from losing momentum.
When ...
Engine coolant recommendation
Engine coolant
Use an anti-freeze/engine coolant compatible with an
aluminum radiator, mixed with distilled water only.
Water for mixing
Use distilled water only. Water other than distilled water
can corrode and clog the aluminum radiator.
Anti-freeze / engine coolant
The engine coolant perfo ...
Headlight bulb and position light bulb
replacement
Caution
when you touch the bulb with your bare
hands, clean the bulb with a cloth moistened
with alcohol or soap water to prevent
premature bulb failure.
Low beam bulb
Remove the combination meter. Refer to “combination meter removal and
installation” in section 9c .
...