Suzuki GSX-R 1000 Service Manual: Headlight bulb and position light bulb replacement
| Caution when you touch the bulb with your bare hands, clean the bulb with a cloth moistened with alcohol or soap water to prevent premature bulb failure. |
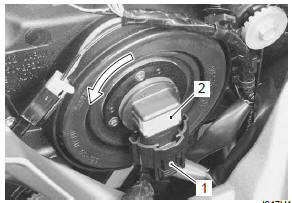
Low beam bulb
- Remove the combination meter. Refer to “combination meter removal and installation” in section 9c .
- Disconnect the headlight (low beam) coupler (1).
- Remove the headlight bulb/socket (low beam) (2) by turning it counterclockwise.
- Replace the headlight bulb (low beam) with a new one.
- Reinstall the removed parts.
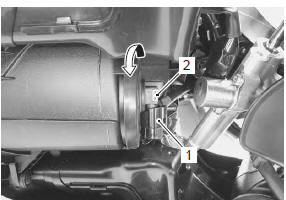
High beam bulb
- Remove the body cowling cover. Refer to “exterior parts removal and installation” in section 9d .
- Disconnect the headlight (high beam) coupler (1).
- Remove the headlight bulb/socket (high beam) (2) by turning it counterclockwise.
- Replace the headlight bulb (high beam) with a new one.
- Reinstall the removed parts.
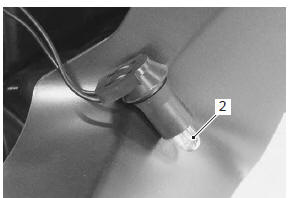
Position light bulb
- Disconnect the position light socket (1).
- Replace the position light bulb (2) with a new one.
- Reinstall the position light socket.
 Headlight removal and installation
Removal
Remove the body cowling assembly. Refer to “exterior parts removal and
installation” in section 9d .
Remove the air intake pipes (1). Refer to “exterior parts removal and
ins ...
 Headlight beam adjustment
Adjust the headlight beam, both horizontally and
vertically.
Note
to adjust the headlight beam, adjust the
beam horizontally first, then vertically.
It is not necessar ...
Other materials:
Modification
Modification of the motorcycle, or
removal of original equipment
may render the vehicle unsafe or
illegal. Obey all applicable equipment
regulations in your area.
The frame of this motorcycle is
made of an aluminum alloy.
Therefore, never make any modifications
such as drilling or weldin ...
Washing the motorcycle
When washing the motorcycle,
follow the instructions below:
Remove dirt and mud from the
motorcycle with running water.
You may use a soft sponge or
brush. Do not use hard materials
which can scratch the
paint.
Wash the entire motorcycle
with a mild detergent or car
...
Front fork components
Front fork cap
O-ring
Rebound damping force adjuster rod
Compression damping force adjuster rod
Piston rod nut
O-ring
Piston ring
Rod guide case
Spring
Piston rod
Spring collar b
Spring
Spring collar a
Slide bushing
Outer tu ...