
Suzuki GSX-R 1000 Owners Manual: Tire condition and type
Tire condition and tire type affect motorcycle performance. Cuts or cracks in the tires can lead to tire failure and loss of motorcycle control. Worn tires are susceptible to puncture failures and subsequent loss of motorcycle control.
Tire wear also affects the tire profile, changing motorcycle handling characteristics.
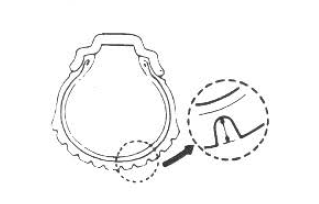
Check tire conditions each day before you ride. Replace tires if tires show visual evidence of damage, such as cracks or cuts, or if tread depth is less than 1.6 Mm (0.06 In) front, 2.0 Mm (0.08 In) rear.
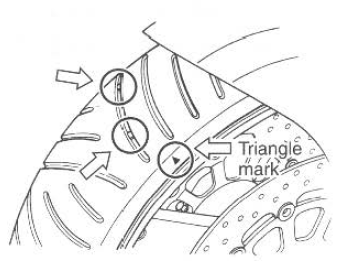
Note
: the ''triangle mark" indicates the place where the wear bars are molded into the tire.
When the wear bars contact the road, it indicates that the tire wear limit has been reached. Whenever you replace a tire, use a tire of the size and type listed below. If you use a different size or type of tire, motorcycle handling may be adversely affected, possibly resulting in loss of motorcycle control.
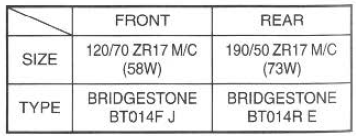
Always balance the wheel after repairing a puncture or replacing the tire. Proper wheel balance is important to avoid variable wheelto- road contact, and to avoid uneven tire wear.
 Warning Warning
|
| Warning
|
 Tire pressure and loading
Proper tire pressure and proper
tire loading are important factors.
Overloading your tires can lead to
tire failure and loss of vehicle control.
Check tire pressure each day
before you ride, ...
 Side standngnition interlock switch
Check the side stand/ignition
interlock system for proper operation
as follows:
Sit on the motorcycle in the
normal riding position, with the
side stand up.
Shift into firs ...
Other materials:
Front brake hose routing diagram
Hose clamp
: clamp end should face downward.
Stopper
: after the brake hose union has contacted to the stopper, tighten
the union bolt.
Hose guide
: pass the brake hose through the hose guide.
Stopper
: after positioning the clamp with the stopper ...
Specifications
Service data
Electrical
unit: mm
Caution
never use anything except the specified battery.
Tightening torque specifications
Note
the specified tightening torque is described in the following.
“Regulator / rectifier construction”
Reference: for the tig ...
Rear wheel removal
Place the motorcycle on the
side stand.
Remove the cotter pin 1.
Remove the axle nut 2.
Warning
A hot muffler can burn you.
The muffler will be hot enough
to burn you for some time after
stopping the engine.
Wait until the muffler cools to
avoid bur ...