Suzuki GSX-R 1000 Service Manual: Tire removal and installation
Removal
The most critical factor of a tubeless tire is the seal between the wheel rim and the tire bead. For this reason, it is recommended to use a tire changer that can satisfy this sealing requirement and can make the operation efficient as well as functional.
- Removal the wheel assembly. Refer to “front wheel assembly removal and installation” and “rear wheel assembly removal and installation” .
- Remove the mounting drum from the rear wheel.
(For rear wheel) refer to “rear wheel assembly removal and installation” .
- Remove the valve core.
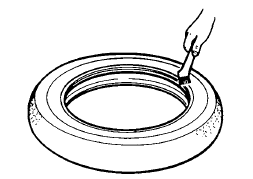
- Remove the tire using the tire changer.
| Caution for operating procedures, refer to the instructions supplied by the tire changer manufacturer. |
| Note when removing the tire in case of repair or inspection, mark the tire with a chalk to indicate the tire position relative to the valve position. Even though the tire is refitted to the original position after repairing puncture, the tire may have to be balanced again since such a repair can cause imbalance. |

Installation
| Caution do not reuse the valve which has been once removed. |
- Apply tire lubricant to the tire bead.
| Caution never use oil, grease or gasoline on the tire bead in place of tire lubricant. |
- Install the tire onto the wheel.
| Caution for installation procedure of tire onto the wheel, follow the instructions given by the tire changer manufacturer. |
Note
|
- Bounce the tire several times while rotating. This makes the tire bead expand outward to contact the wheel, thereby facilitating air inflation.
- Install the valve core and inflate the tire.

|
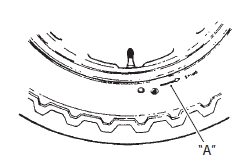
- In this condition, check the “rim line” “b” cast on the tire side walls. The line must be equidistant from the wheel rim all around.
- If the distance between the rim line and wheel rim varies, this indicates that the bead is not properly seated. If this is the case, deflate the tire completely and unseat the bead for both sides. Coat the bead with lubricant and fit the tire again.
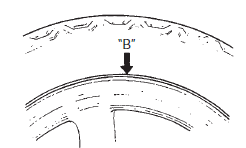
- When the bead has been fitted properly, adjust the pressure to specification.
- As necessary, adjust the tire balance. Refer to “wheel balance check and adjustment” (page 2d- 17).
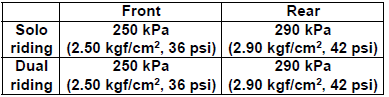
Cold inflation tire pressure
- Install the mounting drum to the rear wheel.
(For rear wheel) refer to “rear wheel assembly removal and installation” .
- Install the wheel assembly. Refer to “front wheel assembly removal and installation” and “rear wheel assembly removal and installation” .
 Rear wheel dust seal / bearing removal and installation
Removal
Remove the rear wheel assembly. Refer to “rear wheel assembly removal
and installation” .
Remove the rear sprocket mounting drum assembly
(1) from the rear wheel.
Re ...
 Wheel / tire / air valve inspection and cleaning
Refer to “tire removal and installation” .
Wheel
Wipe the wheel clean and check for the following points:
distortion and crack
any flaws and scratches at the bead seating area.
& ...
Other materials:
Headlight removal and installation
Removal
Remove the body cowling assembly. Refer to “exterior parts removal and
installation” in section 9d .
Remove the air intake pipes (1). Refer to “exterior parts removal and
installation” in section 9d .
Remove the wiring harness no. 2 (2) By
disconnecting the couplers and ...
Rear brake master cylinder disassembly and assembly
Refer to “rear brake master cylinder assembly removal and installation” .
Disassembly
Disconnect the reservoir hose (1).
Remove the lock-nut (2).
Remove the brake hose connector (3) and o-ring
(4).
Special tool
: 09900–06108 (snap ring remover
(close
type))
Pu ...
Precautions
Precautions for maintenance
The “periodic maintenance schedule chart” lists the recommended intervals for
all the required periodic service work
necessary to keep the motorcycle operating at peak performance and economy.
Maintenance intervals are expressed
in terms of kilometers, miles and mo ...