Suzuki GSX-R 1000 Service Manual: Combination meter inspection
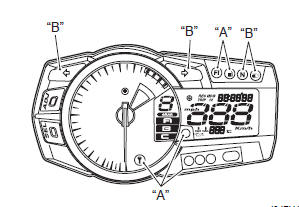
Led inspection
Check that the leds “a” (fi, fuel, engine rpm, oil pressure/engine coolant, immobilizer (e-02, 19, 24, 51) and meter panel illumination) immediately light up when the ignition switch is turned on.
Check that the other leds “b” (neutral, high-beam and turn signal indicator lights) light up/go off by operating each switch.
If abnormal condition is found, replace the combination meter assembly with a new one after checking its wire harness/coupler. Refer to “combination meter removal and installation” .
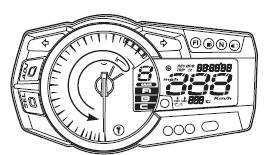
Stepping motor inspection and adjustment
- Check that the pointers calibrate immediately after
turning the ignition switch on and stop at zero point.
If abnormal condition is found, replace the combination meter assembly with a new one after checking its wire harness/coupler.
Note
|
- With the adj button (1) pressed, turn the ignition switch on.
- Keep pushing the adj button for more than 3 to 5 sec.
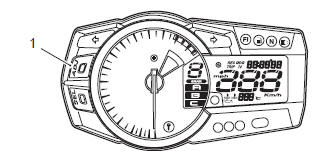
- Release the adj button, then tap it twice.
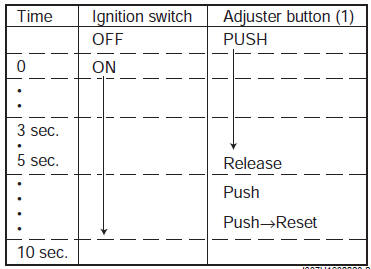
Pointers will return to the proper position right after the completion of the operation. In the case of the pointers not returning to the proper position after doing above, replace the combination meter unit.
Refer to “combination meter removal and installation” .
 Combination meter disassembly and
assembly
Combination meter disassembly and
assembly
Refer to “combination meter removal and installation” .
Disassembly disassemble the combination meter as shown in the combination meter
components. Refer to “combination meter components” .
As ...
 Engine coolant temperature indicator light inspection
Inspect the engine coolant temperature meter and indicator light (led) in the
following procedures:
remove the left side cowling. Refer to “exterior parts removal and
installation” in s ...
Other materials:
Front wheel dust seal / bearing removal and installation
Removal
Remove the front wheel assembly. Refer to “front wheel assembly removal
and installation” .
Remove the dust seals using the special tool.
Special tool
(a): 09913–50121 (oil
seal remover)
Remove the wheel bearings using the special tool.
Special tool
(b): 099 ...
Oil jet inspection
Refer to “oil jet removal and installation” .
Oil jet
Make sure that the oil jets are not clogged. If they are
clogged, clean their oil passage using a wire of the
proper size and compressed air.
Piston cooling jet
Oil jet (for transmission)
Oil jet (for cam chain te ...
Radiator reservoir tank removal and
installation
Removal
Remove the right side cowling. Refer to “exterior parts removal and
installation” in section 9d .
Disconnect the reservoir tank inlet hose (1) from the
reservoir tank (2) and drain the engine coolant.
Remove the reservoir tank (2).
Disconnect the reservoir tank ove ...