Suzuki GSX-R 1000 Service Manual: Excva removal and installation
Removal
- Turn the ignition switch off.
- Remove the left side cowling. Refer to “exterior parts removal and installation” in section 9d .
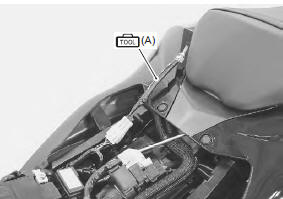
- Connect the special tool (mode select switch) to the dealer mode coupler. Refer to “self-diagnostic procedures” in section 1a .
- After turning the mode select switch on, turn the ignition switch on.
Special tool
 (a): 09930–82720 (mode selection
switch)
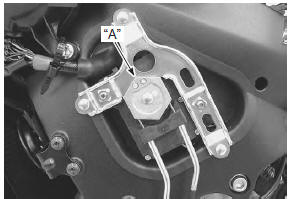
- Check that the cable slots of the excva pulley comes to the middle (adjustment position) “a”.
- Turn the ignition switch off.
| Caution before removing the excva, be sure to set the excva pulley to the adjustment position. |
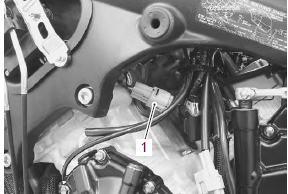
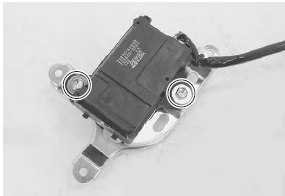
- Disconnect the excva coupler (1).
- Remove the excv cables (2). Refer to “excv cable removal and installation” .
- Remove the excva (3) with the bracket.
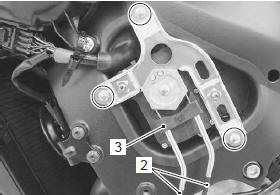
- Remove the bracket from the excva
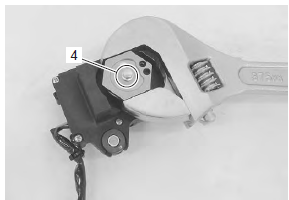
- Hold the pulley with an adjustable wrench, and loosen the pulley mounting bolt (4).
Caution
|
- Remove the pulley from the excva body.
Installation
Install the excva in the reverse order of removal. Pay attention to the following points:
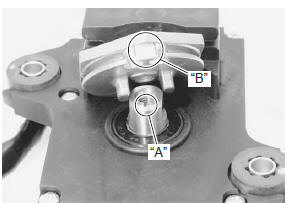
- install the excva pulley to the shaft.
| Note align the shaft’s line “a” and cable slots “b”. |
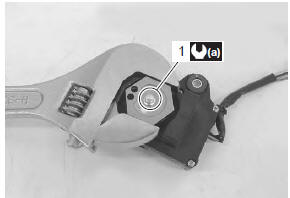
- Hold the pulley with an adjustable wrench, and then tighten the pulley mounting bolt (1) to the specified torque.
Tightening torque excva pulley mounting bolt (a): 5 n·m (0.5 Kgfm, 3.5 Lbf-ft)
| Caution when loosening or tightening the pulley bolt, be sure to fix the pulley with an adjustable wrench, or excva may get damaged. |
- Install the excv cables. Refer to “excv cable removal and installation” .
- Adjust the excva. Refer to “excva adjustment” .
Excva inspection
Refer to “dtc “c46” (p1657-h/l or p1658): excv actuator circuit malfunction” in section 1a (page 1a- 109).
 Excv cable removal and installation
Removal
Turn the ignition switch off.
Remove the front seat. Refer to “exterior parts
removal and installation” in section 9d (page 9d-
6).
Remove the left side cowling. Refer ...
 Excva pulley inspection
Inspect the excva pulley in the following procedures:
remove the excva pulley. Refer to “excv cable removal and installation”
.
Visually inspect the excva pulley for wear and
da ...
Other materials:
Starter relay removal and installation
Removal
Turn the ignition switch off.
Remove the front seat. Refer to “exterior parts
removal and installation” in section 9d (page 9d-
6).
Disconnect the battery (–) lead wire (1) from the
battery.
Remove the starter relay cover (2) and disconnect
the starter rel ...
Fuses
The main fuse is located under
the front seat. To access the fuse,
remove the seat by referring to
the seat lock and helmet
holders.
The fuses are located inside the
left fairing. One 1 oa and one 15a
spare fuses are provided inside
the fuse box.
They are designed to open when ...
Crankshaft thrust clearance inspection and
selection
Refer to “engine bottom side disassembly” (page 1d-
49).
Refer to “engine bottom side assembly” .
Inspection
With the crankshaft’s right-side and left-side thrust
bearings inserted into the upper crankcase.
Measure the thrust clearance “a” between the leftside
thrust bearing and ...