Suzuki GSX-R 1000 Service Manual: Front brake pad replacement
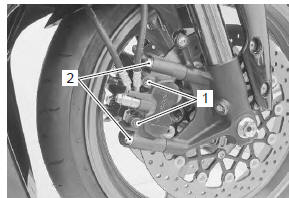
- Loosen the pad mounting pins (1).
- Remove the brake caliper by removing the caliper mounting bolts (2).
- Remove the pad mounting pins (1), brake pads and spring.
| Caution do not operate the brake lever while the pads are removed. |
| Note when removing the pads and pad spring, push the pistons all the way into the brake caliper. |
- Clean up the caliper especially around the caliper pistons.
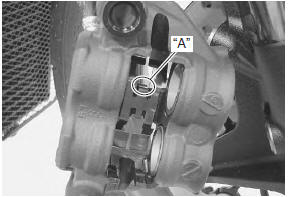
- When installing the spring to caliper, bring its wider pawl “a” to top side.
- Install new brake pads and temporarily tighten the pad mounting pins.
| Caution replace the brake pads as a set, otherwise braking performance will be adversely affected. |
- Install the brake caliper.
- Tighten the front brake caliper mounting bolts (2) and front brake pad mounting pins (1) to the specified torque.
Tightening torque front brake caliper mounting bolt (a): 39 n·m ( 3.9 Kgf-m, 28.0 Lbf-ft) front brake pad mounting pin (b): 15 n·m (1.5 Kgf-m, 11.0 Lbf-ft)

| Note after replacing the brake pads, pump the brake lever several times to check for proper brake operation and then check the brake fluid level. |
 Front brake pad inspection
The extent of brake pads wear can be checked by observing the grooved limit
line “a” on the pads. When the wear exceeds the grooved limit line, replace the
pads with new ones. Refer to “front brak ...
 Front brake caliper removal and installation
Note
the right and left calipers are installed
symmetrically and therefore the removal
procedure for one side is the same as that for
the other side.
Removal
Drain brake f ...
Other materials:
Precautions
Keep away from fire or spark.
During disassembling, use care to minimize spillage of
gasoline.
Spilled gasoline should be wiped off immediately.
Work in a well-ventilated area.
For e-33 models, drain fuel from the fuel tank before
...
Swingarm bearing removal and installation
Removal
Remove the swingarm. Refer to “swingarm removal and installation” .
Remove the swingarm pivot bearings (1) using the
special tool.
Special tool
(a):
09921–20240 (bearing remover set)
Remove the center spacer (2).
Remove the cushion lever bearing (3) usin ...
Rear shock absorber disposal
Refer to “rear shock absorber removal and installation” .
The rear shock absorber unit contains high-pressure
nitrogen gas.
Mishandling can cause explosion.
Keep away from fire and heat. High gas
pressure caused by heat can cause an
explosion.
Release gas ...