Suzuki GSX-R 1000 Service Manual: Front wheel dust seal / bearing removal and installation
Removal
- Remove the front wheel assembly. Refer to “front wheel assembly removal and installation” .
- Remove the dust seals using the special tool.
Special tool
 (a): 09913–50121 (oil
seal remover)
- Remove the wheel bearings using the special tool.
Special tool
 (b): 09921–20240 (bearing remover
set)
- Remove the spacer (1).
Installation
| Caution the removed dust seals and bearings must be replaced with new ones. |
- Apply grease to the wheel bearings.
 : Grease 99000–25010 (suzuki
super
grease “a” or equivalent)

- First install the right wheel bearing, then install the spacer (1) and left wheel bearing with the special tool.
Special tool
(a):
09924–84510 (bearing installer set)
(b):
09941–34513 (bearing installer)
| Caution the sealed cover of the bearing must face outside. |
|
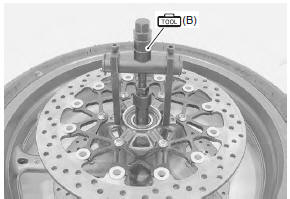
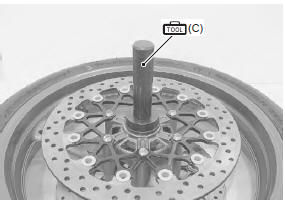
- Install the dust seals with the special tool.
Special tool
(c):
09913–70210 (bearing installing set (10
– 75 Ô))
- Apply grease to the lip of dust seals.
 : Grease 99000–25010 (suzuki
super
grease “a” or equivalent)
- Install the front wheel assembly. Refer to“front wheel assembly removal and installation” .
 Front wheel related parts inspection
Refer to “front wheel assembly removal and installation” .
Tire
Refer to “tire inspection” in section 0b .
Front brake disc
Refer to “front brake disc inspection” in section 4b .
Dust seal
...
 Rear wheel components
Rear axel nut
Collar
Dust seal
Bearing
Retainer
Rear sprocket
Sprocket mounting drum
Wheel damper
Bearing
Spacer
Air valve
Rear wheel
...
Other materials:
Front wheel assembly removal and installation
Removal
Remove the brake calipers, left and right.
Caution
do not operate the brake lever with the
caliper removed.
Loosen two axle pinch bolts (1) on the right front fork
leg.
Remove the front axle bolt (2).
Raise the front wheel off the ground a ...
Inspection before riding
Warning
Failure to inspect and maintain
your motorcycle properly
increases the chance of an
accident or equipment damage.
Always perform a pre-ride
inspection before each ride.
Refer to the table on page 4-4
for check items. For further
details, refer to the inspec· ...
Exhaust control valve inspection
Inspect exhaust control valve
initially at 1 000 km (600 miles, 2 months) and every
12 000 km (7 500 miles, 24 months) thereafter
Inspect exhaust control valve as follows:
remove the left side cowling. Refer to “exterior parts removal and
installation” in section 9d .
Check t ...