Suzuki GSX-R 1000 Service Manual: Rear wheel components
|
 100 N·m (10.0 Kgf-m,
 35 N·m
 60 N·m
 Apply grease
 Apply thread lock to the
 Do not reuse.
 Front wheel dust seal / bearing removal and installation
Removal
Remove the front wheel assembly. Refer to “front wheel assembly removal
and installation” .
Remove the dust seals using the special tool.
Special tool
(a): 09913–50121 (oil ...
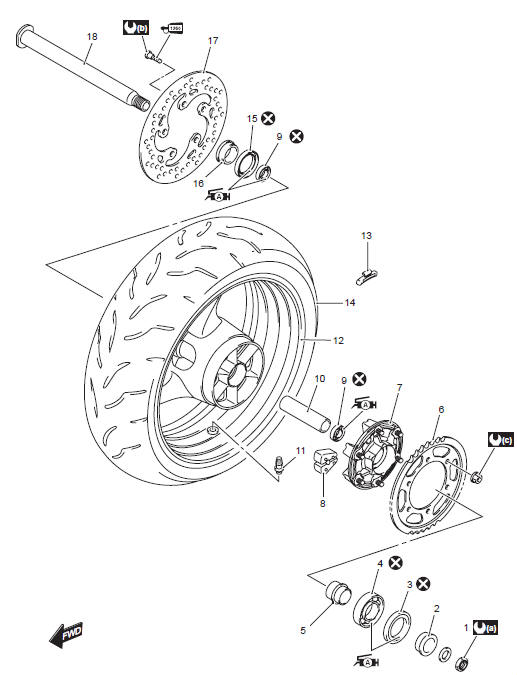
 Rear wheel assembly construction
Rear sprocket nut
Rear axle nut
Brake disc bolt
Clearance
60 N·m (6.0 Kgf-m,
43.0 Lbf-ft)
100 N·m
(10 kgf-m, 72.5 Lbf-ft)
35 N·m
(3.5 Kg ...
Other materials:
Crankshaft journal bearing inspection and
selection
Refer to “engine bottom side disassembly” (page 1d-
49).
Refer to “engine bottom side assembly” .
Inspection
Inspect each upper and lower crankcase bearing for
any damage.
Set the crankshaft onto the upper crank case.
Install the plastigauge onto each crankshaft jour ...
Diagnostic information and procedures
Engine mechanical symptom diagnosis
Refer to “engine symptom diagnosis” in section 1a .
Compression pressure check
The compression pressure reading of a cylinder is a
good indicator of its internal condition.
The decision to overhaul the cylinder is often based on
the results of a compressio ...
Front brake master cylinder components
Reservoir cap
Plate
Diaphragm
Reservoir tank
Master cylinder
Dust boot
Piston set
Brake lever
Brake lever pivot bolt
Brake lever pivot bolt lock-nut
Brake light switch
Brake hose union bolt
Brake hose
23 N·m (2.3 Kgf-m,
...