Suzuki GSX-R 1000 Service Manual: Diagnostic information and procedures
Engine mechanical symptom diagnosis
Refer to “engine symptom diagnosis” in section 1a .
Compression pressure check
The compression pressure reading of a cylinder is a good indicator of its internal condition.
The decision to overhaul the cylinder is often based on the results of a compression test. Periodic maintenance records kept at your dealership should include compression readings for each maintenance service.
Note
|
- Warm up the engine.
- Lift and support the fuel tank. Refer to “fuel tank removal and installation” in section 1g (page 1g- 9).
- Remove the air cleaner box. Refer to “air cleaner box removal and installation” .
- Remove all the spark plugs. Refer to “ignition coil and spark plug removal and installation” in section 1h .
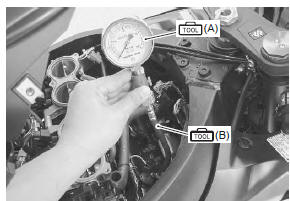
- Install the compression gauge and adaptor in the spark plug hole. Make sure that the connection is tight.
Special tool
 (a): 09915–64512 (compression
gauge)
 (b): 09915–63311 (compression gauge
attachment)
- Keep the throttle grip in the fully-opened position.
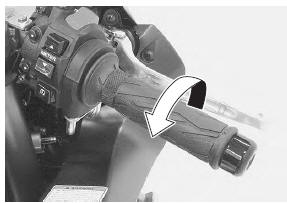
- Press the starter button and crank the engine for a few seconds. Record the maximum gauge reading as the cylinder compression.
- Repeat this procedure with the other cylinders.
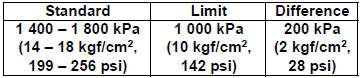
Compression pressure specification
Low compression pressure can indicate any of the following conditions:
- excessively worn cylinder walls
- worn piston or piston rings
- piston rings stuck in grooves
- poor valve seating
- ruptured or otherwise defective cylinder head gasket
Overhaul the engine in the following cases:
- compression pressure in one of the cylinders is 1 000 kpa (10 kgf/cm2, 142 psi) and less.
- The difference in compression pressure between any two cylinders is 200 kpa (2 kgf/cm2, 28 psi) and more.
- All compression pressure readings are below 1 400 kpa (14 kgf/cm2, 199 psi) even when they measure 1 000 kpa (10 kgf/cm2, 142 psi) and more.
- After checking the compression pressure, reinstall the removed parts.
 Throttle cable routing diagram
Throttle cable no. 1
Throttle cable no. 2
Clutch cablev
Front brake hose
Pass
the throttle cables in front of the front brake hose.
Pass the
clutch ca ...

Other materials:
Front wheel related parts inspection
Refer to “front wheel assembly removal and installation” .
Tire
Refer to “tire inspection” in section 0b .
Front brake disc
Refer to “front brake disc inspection” in section 4b .
Dust seal
Inspect the lip of dust seals for wear or damage. If any
defects are found, replace the dust seal ...
Ignition switch removal and installation
Removal
Remove the air cleaner box. Refer to “air cleaner box removal and
installation” in section 1d .
Disconnect the ignition switch lead wire coupler (1).
Disconnect the immobilizer lead wire coupler (2).
(For e-02, 19, 24, 51)
Remove the harness clamp (3).
...
DTC “c60” (p0480): cooling fan relay
circuit malfunction
Detected condition and possible cause
Detected condition
Possible cause
Cooling fan relay signal is not input to ecm.
Cooling fan relay circuit open or short.
Ecm malfunction.
Wiring diagram
Troubleshooting
Caution
when using ...