Suzuki GSX-R 1000 Service Manual: Iat sensor removal and installation
Removal
- Remove the air cleaner box. Refer to “air cleaner box removal and installation” in section 1d .
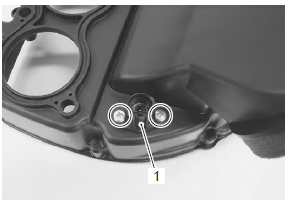
- Remove the iat sensor (1) from the air cleaner box.
Installation
Install the iat sensor in the reverse order of removal.
Pay attention to the following point:
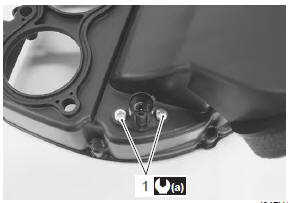
- tighten the iat sensor screw (1) to the specified torque.
Tightening torque iat sensor mounting screw (a): 1.3 N·m (0.13 Kgfm, 1.0 Lbf-ft)
 Ect sensor inspection
Refer to “dtc “c15” (p0115-h/l): ect sensor circuit malfunction” in section
1a .
Inspect the ect sensor in the following procedures:
remove the ect sensor. Refer to “ect sensor removal ...
 Iat sensor inspection
Refer to “dtc “c21” (p0110-h/l): iat sensor circuit malfunction” in section
1a .
Inspect the iat sensor.
Note
iat sensor resistance measurement method
is the same way as that of the ...
Other materials:
DTC “c41” (p0230-h/l): fp relay circuit
malfunction
Detected condition and possible cause
Detected condition
Possible cause
C41
No voltage is applied to fuel pump.
Fuel pump relay circuit open or short.
Fuel pump relay malfunction.
Fuel pump relay switch circuit is shorted to power
source.
...
Radiator inspection and cleaning
Radiator hose inspection
Refer to “cooling system inspection” in section 0b .
Radiator inspection
Inspect the radiator for water leaks. If any defects are
found, replace the radiator with a new one.
If the fins are bent or dented, repair them by carefully
straightening them with the blade of ...
Specifications
Service data
Suspension
unit: mm (in)
Tightening torque specifications
Note
the specified tightening torque is described in the following.
“Rear suspension components” “rear suspension assembly
construction”
Reference: for the tightening torque of fastener ...