Suzuki GSX-R 1000 Owners Manual: Maintenance schedule
It is very important to inspect and maintain your motorcycle regularly.
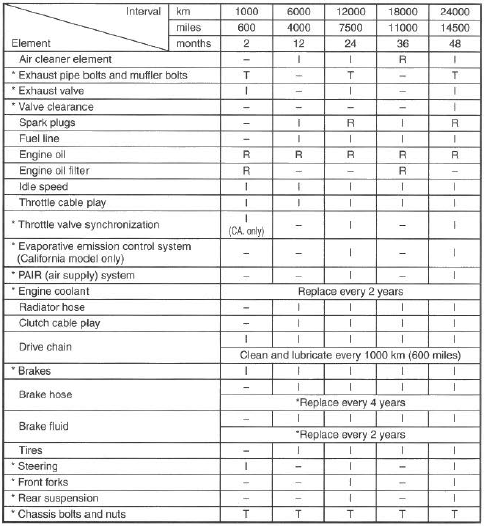
Follow the guidelines in the chart. The intervals between periodic services in kilometers, miles and months are shown. At the end of each interval, be sure to perlorm the maintenance listed.
 Warning Warning
Always follow the inspection and maintenance recommendations and schedules in this owner's manual. Ask your suzuki dealer or qualified mechanic to do the maintenance items marked with an asterisk (*). You may perform the unmarked maintenance items by referring to the instructions in this section, if you have mechanical experience. If you are not sure how to do any of the jobs, have your suzuki dealer or qualified mechanic do them |
| Warning
Exhaust gas contains carbon monoxide, a gas that is colorless and odorless and can cause death or severe injury. Only run the engine outdoors where there is fresh air. |
Note
: the maintenance chart specifies the minimum requirements for maintenance. If you use your motorcycle under severe conditions, perform maintenance more often than shown in the chart. If you have any questions regarding maintenance intervals, consult your suzuki dealer or qualified mechanic.
|
Caution Using poor quality replacement parts can cause your motorcycle to wear more quickly and may shorten its useful life. Use only genuine suzuki replacement parts or their equivalent. |
Maintenance chart
Interval: this interval should be judged by odometer reading or months, whichever comes first.
Note
: i= inspect and clean, adjust, replace or lubricate as necessary, r== replace, t == tighten
Note
: (california model only) and (ca. Only) means that the items or the maintenance interval is to be applied only for the california model.
 Inspection and maintenance
Notice
Maintenance, replace·
ment or repair of the
emission control devices
and systems may be per·
formed by any motorcy·
cle repair establishment
or individual using any
...
 Tools
Tools
A tool kit is provided with your
motorcycle. It is located under the
rear seat. ...
Other materials:
Ecm / various sensors
Since each component is a high-precision part, great
care should be taken not to apply any severe impacts
during removal and installation.
Be careful not to touch the electrical terminals of the
electronic parts (ecm, etc.). The static electricity from
your body may damage them. ...
DTC “c91” (p0500): vehicle speed sensor
circuit malfunction
Detected condition and possible cause
Detected condition
Possible cause
Speedometer does not receive signal from the vehicle
speed sensor for more than 6 sec. When the motorcycle is
running. Ecm does not receive signal from the vehicle
speed sensor for more than ...
Front wheel assembly construction
Brake disc bolt
Brake caliper mounting bolt
Front axle bolt
Front axle pinch bolt
Clearance
18 N·m (1.8 Kgf-m,
13.0 Lbf-ft)
39 N·m
(3.9 Kgf-m, 28.0 Lbf-ft)
100 N·m
(10 kgf-m, 72.5 Lbf-ft)
23 N·m
(2.3 Kgf-m, 16.5 Lbf-ft)
...