Suzuki GSX-R 1000 Service Manual: Starter motor inspection
Refer to “starter motor disassembly and assembly” .
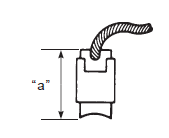
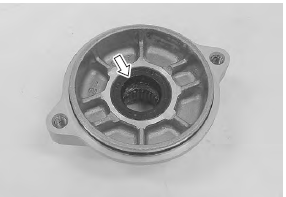
Carbon brush
Inspect the carbon brushes for abnormal wear, cracks or smoothness in the brush holder.
If either carbon brush is defective, replace the brush holder set with a new one.
Measure the length “a” of the carbon brushes using a vernier calipers. If the measurement is less than the service limit, replace the housing end assembly (outside) with a new one.
Brush length “a” service limit: 3.5 Mm (0.14 In)
Special tool
 : 09900–20102 (vernier calipers
(200 mm))
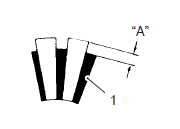
Commutator
Inspect the commutator for discoloration, abnormal wear or undercut “a”.
If the commutator is abnormally worn, replace the armature assembly.
If the commutator surface is discolored, polish it with #400 sandpaper and wipe it using a clean, dry cloth.
If there is no undercut, scrape out the insulator (1) with a saw blade.
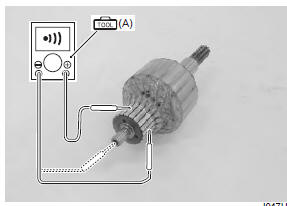
Armature coil
Inspect for continuity between each segment.
Inspect for continuity between each segment and the armature shaft.
If there is no continuity between the segments or there is continuity between the segments and shaft, replace the armature assembly with a new one.
Special tool
 (a): 09900–25008 (multi circuit
tester set)
Tester knob indication
continuity set (  )
)
Bearing
Check the bearings for damage.
If any damage is found, replace the housing end.
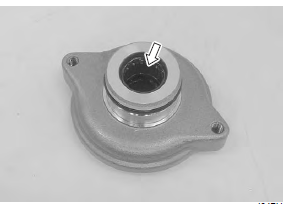
Oil seal
Check the seal lip for damage.
If any damage is found, replace the housing end.
 Starter motor disassembly and assembly
Refer to “starter motor removal and installation” .
Disassembly
Disassemble the starter motor as shown in the starter motor components
diagram. Refer to “starter motor components” .
Assembly
Rea ...
 Starter relay removal and installation
Removal
Turn the ignition switch off.
Remove the front seat. Refer to “exterior parts
removal and installation” in section 9d (page 9d-
6).
Disconnect the battery (–) lead wire ...
Other materials:
Headlight
To replace the headlight bulbs,
perform the following steps:
Upper light bulb
Remove the bolt 1 to lift the
instrument panel 2.
Turn the cap 3 counterclockwise
and remove it.
Unhook the bulb holder spring
4 and pull out the socket 5.
Pull off the bulb from ...
Drive chain inspection and adjustment
Inspect drive chain
initially at 1 000 km (600 miles, 2 months) and every
6 000 km (4 000 miles, 12 months) thereafter
Drive chain visual check
With the transmission in neutral, support the
motorcycle using a jack and turn the rear wheel
slowly by hand.
Visually check the drive chain fo ...
Engine coolant solution
Use engine coolant that is com·
patible with an aluminum radiator,
mixed with distilled water at a
50:50 mixture ratio for engine
coolant solution. An engine coolant
mixture other than 50:50 can
affect cooling efficiency or rust
inhibiting performance.
Engine coolant
Engine coolant should b ...