Suzuki GSX-R 1000 Service Manual: Use of sds diagnosis reset procedures
| Note the malfunction code is memorized in the ecm also when the lead wire coupler of any sensor is disconnected. Therefore, when a lead wire coupler has been disconnected at the time of diagnosis, erase the stored malfunction history code using sds. |
- After repairing the trouble, turn off the ignition switch and turn on again.
- Click the dtc inspection button (1).
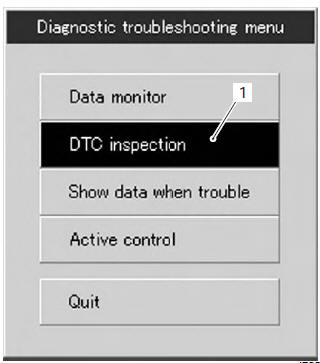
- Check the dtc.
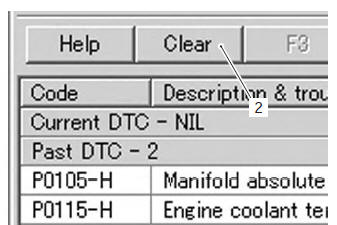
- The previous malfunction history code (past dtc) still remains stored in the ecm. Therefore, erase the history code memorized in the ecm using sds tool.
- Click “clear” (2) to delete history code (past dtc).
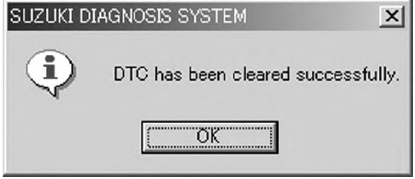
- Follow the displayed instructions.

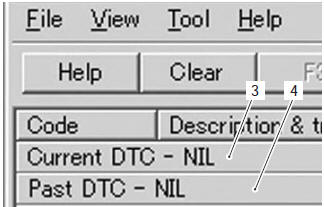
- Check that both “current dtc” (3) and “past dtc” (4) are deleted (nil).
- Close the sds tool and turn the ignition switch off.
- Disconnect the sds tool and install the front seat.
 Self-diagnostic procedures
Use of mode select switch
Note
do not disconnect the coupler from ecm,
battery cable from battery, ecm ground
wire from engine or main fuse before
confirming dtc (diagnos ...
 Show data when trouble (displaying data at
the time of DTC)
Show data when trouble (displaying data at
the time of DTC)
Use of sds
Ecm stores the engine and driving conditions (in the form of data as shown in
the figure) at the moment of the
detection of a malfunction in its memory. This data is called “show data w ...
Other materials:
The sport of motorcycling
Your motorcycle and this owner's
manual have been designed by
people like you who enjoy motorcycling.
People become motorcyclists
for many reasons. For
starters, street riding is fun and
invigorating. But no matter why
you became a motorcyclist, or
how experienced you are, you will
eventu ...
Battery current leakage inspection
Inspect the battery current leakage in the following
procedures:
turn the ignition switch off.
Remove the front seat. Refer to “exterior parts
removal and installation” in section 9d (page 9d-
6).
Disconnect the battery (–) lead wire.
Measure the current betwee ...
Know your limits
Always ride within the boundaries
of your own skills. Knowing these
limits and staying within them will
help you avoid accidents.
A major cause of accidents involving
only a motorcycle (and no
cars) is going too fast through a
turn. Before entering a turn, select
an appropriately low corne ...