Suzuki GSX-R 1000 Service Manual: Diagnostic information and procedures
Engine mechanical symptom diagnosis
Refer to “engine symptom diagnosis” in section 1a .
Compression pressure check
The compression pressure reading of a cylinder is a good indicator of its internal condition.
The decision to overhaul the cylinder is often based on the results of a compression test. Periodic maintenance records kept at your dealership should include compression readings for each maintenance service.
Note
|
- Warm up the engine.
- Lift and support the fuel tank. Refer to “fuel tank removal and installation” in section 1g (page 1g- 9).
- Remove the air cleaner box. Refer to “air cleaner box removal and installation” .
- Remove all the spark plugs. Refer to “ignition coil and spark plug removal and installation” in section 1h .
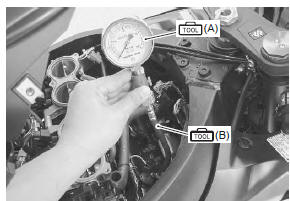
- Install the compression gauge and adaptor in the spark plug hole. Make sure that the connection is tight.
Special tool
 (a): 09915–64512 (compression
gauge)
 (b): 09915–63311 (compression gauge
attachment)
- Keep the throttle grip in the fully-opened position.
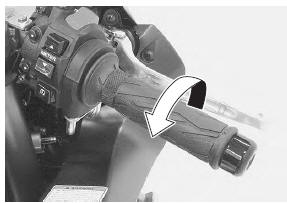
- Press the starter button and crank the engine for a few seconds. Record the maximum gauge reading as the cylinder compression.
- Repeat this procedure with the other cylinders.
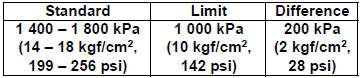
Compression pressure specification
Low compression pressure can indicate any of the following conditions:
- excessively worn cylinder walls
- worn piston or piston rings
- piston rings stuck in grooves
- poor valve seating
- ruptured or otherwise defective cylinder head gasket
Overhaul the engine in the following cases:
- compression pressure in one of the cylinders is 1 000 kpa (10 kgf/cm2, 142 psi) and less.
- The difference in compression pressure between any two cylinders is 200 kpa (2 kgf/cm2, 28 psi) and more.
- All compression pressure readings are below 1 400 kpa (14 kgf/cm2, 199 psi) even when they measure 1 000 kpa (10 kgf/cm2, 142 psi) and more.
- After checking the compression pressure, reinstall the removed parts.
 Throttle cable routing diagram
Throttle cable no. 1
Throttle cable no. 2
Clutch cablev
Front brake hose
Pass
the throttle cables in front of the front brake hose.
Pass the
clutch ca ...

Other materials:
Engine oil
Oil quality is a major contributor to
your engine's performance and
life. Always select good quality
engine oil. Suzuki recommends
the use of suzuki performance
4 motor oil or equivalent
engine oil. Use sf/sg or sh/
sj with jaso ma in api (american
petroleum institute) classification.
A ...
Gearshift lever construction
Gearshift lever bracket
Gearshift lever shaft
Washer
Snap ring
Gearshift lever
Footrest top surface
65 – 75 Mm (2.6 – 3.0 In)
28 N·m (2.8 Kgf-m,
20.0 Lbf-ft)
40 N·m
(4.0 Kgf-m, 29.0 Lbf-ft)
Apply grease.
Grease.
...
Excva removal and installation
Removal
Turn the ignition switch off.
Remove the left side cowling. Refer to “exterior parts removal and
installation” in section 9d .
Connect the special tool (mode select switch) to the dealer mode
coupler. Refer to “self-diagnostic procedures” in section 1a .
After tur ...