Suzuki GSX-R 1000 Service Manual: Drive mode selector description
Engine power characteristics can be changed in 3 modes by operating the drive mode selector to meet various riding conditions and rider’s preference.
Operation
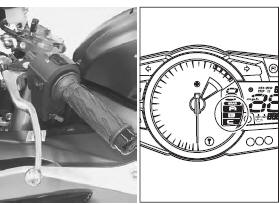
Drive mode is preset at a-mode when the ignition switch and engine stop switch are turned on. Follow the procedure below to operate drive mode selector.
- Turn on the ignition switch and engine stop switch.
- Push the drive mode selector up
 or down
 for 1 second until the drive
mode indicator shows a. - Push the drive mode selector to change drive mode.
Pushing the up
 switch can
change from a to c to b to a. Pushing the down
switch can change from a to b to c to a. The drive mode indicator indicates actual drive mode.
Note
|
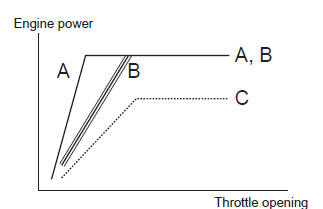
Drive mode
A-mode
A-mode provides sharp throttle response at all throttle opening range to obtain maximum engine power.
B-mode
B-mode provides softer throttle response than a-mode up to middle throttle opening range.
C-mode
C-mode provides soft throttle response at all throttle opening range by reducing engine power.
 Immobilizer description (for e-02, 19, 24, 51)
The immobilizer, an anti-theft system, is installed as a
standard equipment.
The immobilizer verifies that the key id agrees with ecm
id by means of radio communication through the
immobilizer a ...
 Schematic and routing diagram
Ignition system diagram
Refer to “wire color symbols” in section 0a .
Ignition system components location
Refer to “electrical components location” in section 0a . ...
Other materials:
Excva pulley inspection
Inspect the excva pulley in the following procedures:
remove the excva pulley. Refer to “excv cable removal and installation”
.
Visually inspect the excva pulley for wear and
damage. If there is anything unusual, replace the
pulley with a new one.
Install the pulle ...
Valve guide replacement
Remove the cylinder head. Refer to “engine top side disassembly” .
Remove the valves. Refer to “cylinder head disassembly and assembly” .
Using the valve guide remover, drive the valve guide
out toward the intake or exhaust camshaft side.
Special tool
(a): 09916–43211 (valve ...
Regulated voltage inspection
Inspect the regulated voltage in the following
procedures:
remove the front seat. Refer to “exterior parts
removal and installation” in section 9d (page 9d-
6).
Start the engine and keep it running at 5 000 r/min
with the dimmer switch turned hi position.
Measure the dc vo ...