
Suzuki GSX-R 1000 Service Manual: DTC “c93” (p1769): steering damper solenoid valve circuit malfunction
Detected condition and possible cause
|
Detected condition |
Possible cause |
||
|
C93 |
Steering damper control current does not flow to
the solenoid valve. With ig turned on, ecm
detects a failure of internal circuit element. Solenoid current does not converge to the target value. Battery voltage is 10 v or below with the engine running. |
|
|
| P1769 | H | Steering damper control current is higher than specified value. An abnormal current is detected during the vehicle standstill. Solenoid current is 0.7 A or above. | |
| L | Steering damper control current is lower than specified value. With ig turned on, ecm detects a discontinuity. An abnormal current is detected during the vehicle standstill. | ||
Wiring diagram
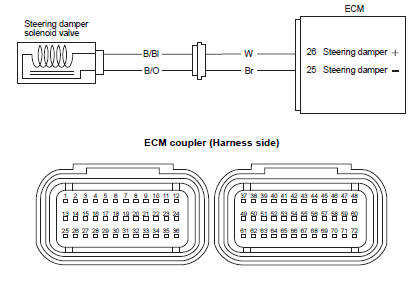
Troubleshooting
| Caution when using the multi-circuit tester, do not strongly touch the terminal of the ecm coupler with a needle pointed tester probe to prevent terminal damage. |
| Note after repairing the trouble, clear the dtc using sds tool. Refer to “use of sds diagnosis reset procedures” . |
|
Step |
Action |
Yes |
No |
|
1 |
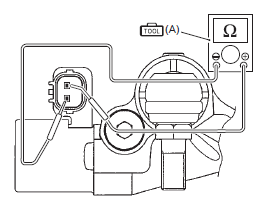
Special tool Tester knob indication resistance (Ω) Steering damper solenoid valve resistance approx. 12.5 Ω at 20 °c (68 °f)
Is the resistance ok? |
Go to step 2. | Replace the steering damper with a new one. |
|
2 |
Special tool Tester knob indication
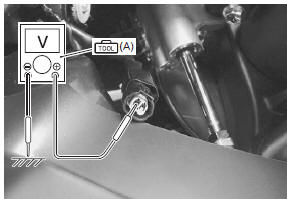
voltage ( Steering damper solenoid valve voltage approx. 10 V when battery is fully charged condition ((+) terminal: b/bl – (–) terminal: ground)
Is the voltage ok? |
|
|
 (a): 09900–25008 (multi
 (a): 09900–25008 (multi
 )
)
Active control inspection
- Set up the sds tool. (Refer to sds operation manual for further details.)
- Raise the front wheel off the ground.
- Turn the ignition switch on.
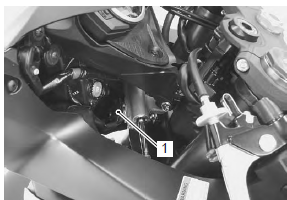
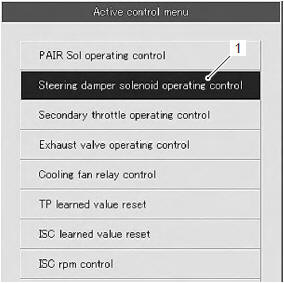
- Click “steering damper solenoid operating control” (1).
- Click each button (2) on/off while turning the handlebars left and right.
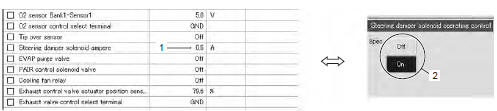
| Note at this time, if the steering damping resistance changes from light to heavy by switching on/off, the function is normal. |
 DTC “c91” (p0500): vehicle speed sensor
circuit malfunction
DTC “c91” (p0500): vehicle speed sensor
circuit malfunction
Detected condition and possible cause
Detected condition
Possible cause
Speedometer does not receive signal from the vehicle
speed sensor for more than 6 sec. When the m ...
 Specifications
Service data
Injector + fuel pump + fuel pressure regulator
Fi sensors
...
Other materials:
Oil pump removal and installation
Note
be careful not to drop any parts into the
crankcase.
Removal
Remove the oil pan, oil pressure regulator and oil strainer. Refer to
“oil pan / oil pressure regulator / oil strainer removal and installation” .
Remove the oil pump driven gear bolt (1).
Rem ...
Rear brake disc removal and installation
Removal
Remove the rear wheel assembly. Refer to “rear wheel assembly removal
and installation” in section 2d .
Remove the rear brake disc.
Installation
Install the rear brake disc in the reverse order of
removal. Pay attention to the following points:
make sure tha ...
Tire condition and type
Tire condition and tire type affect
motorcycle performance. Cuts or
cracks in the tires can lead to tire
failure and loss of motorcycle
control. Worn tires are susceptible
to puncture failures and subsequent
loss of motorcycle control.
Tire wear also affects the tire profile,
changing moto ...