Suzuki GSX-R 1000 Service Manual: Piston and piston ring inspection
Refer to “piston ring removal and installation” .
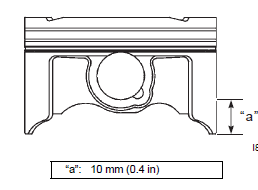
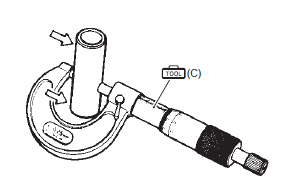
Piston diameter
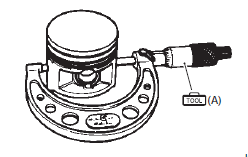
Measure the piston diameter using the micrometer at 15 mm (0.6 In) “a” from the skirt end. If the piston diameter is less than the service limit, replace the piston.
Special tool
 (a): 09900–20203 (micrometer (50 –
75 mm))
Piston diameter service limit: 74.380 Mm (2.9283 In)
Piston-to-cylinder clearance
Subtract the piston diameter from the cylinder bore diameter. If the piston-to-cylinder clearance exceeds the service limit, replace both the cylinder and the piston.
Piston-to-cylinder clearance service limit: 0.120 Mm (0.0047 In)
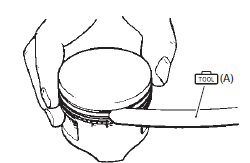
Piston ring-to-groove clearance
Measure the side clearances of the 1st and 2nd piston rings using the thickness gauge. If any of the clearances exceed the limit, replace both the piston and piston rings.
Special tool
 (a): 09900–20803 (thickness gauge)
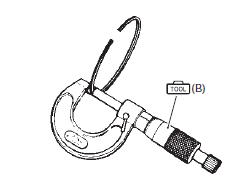
 (b): 09900–20205 (micrometer (0 – 25
mm))
Piston ring-to-groove clearance service limit (1st): 0.180 Mm (0.0071 In) service limit (2nd): 0.150 Mm (0.0059 In)
Piston ring groove width standard (1st): 0.83 – 0.85 Mm (0.0327 – 0.0335 In) standard (1st): 1.30 – 1.32 Mm (0.0512 – 0.0520 In) standard (2nd): 0.81 – 0.83 Mm (0.0319 – 0.0327 In) standard (oil): 1.51 – 1.53 Mm (0.0594 – 0.0602 In)
Piston ring thickness standard (1st): 0.76 – 0.81 Mm (0.0299 – 0.0319 In) standard (1st): 1.08 – 1.10 Mm (0.0425 – 0.0433 In) standard (2nd): 0.77 – 0.79 Mm (0.0303 – 0.0311 In)
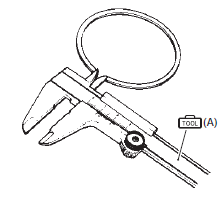
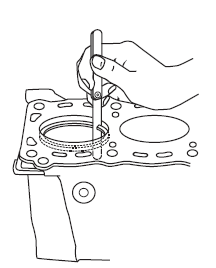
Piston ring free end gap and piston ring end gap
Measure the piston ring free end gap using vernier calipers. Next, fit the piston ring squarely into the cylinder and measure the piston ring end gap using the thickness gauge. If any of the measurements exceed the service limit, replace the piston ring with a new one.
Special tool
 (a): 09900–20102 (vernier calipers
(200 mm))
Piston ring free end gap service limit (1st): 5.6 Mm (0.22 In) service limit (2nd): 6.4 Mm (0.25 In)
Special tool
 (b): 09900–20803 (thickness gauge)
Piston ring end gap service limit (1st): 0.50 Mm (0.020 In) service limit (2nd): 0.50 Mm (0.020 In)
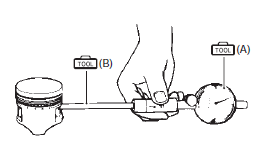
Piston pin and pin bore
Measure the piston pin bore inside diameter using the small bore gauge. If either is out of specification or the difference between these measurements surpass limits, replace the piston.
Special tool
 (a): 09900–20602 (dial gauge)
 (b): 09900–22401 (small bore gauge
(10 – 18
mm))
Piston pin bore service limit: 15.030 Mm (0.5917 In)
Measure the piston pin outside diameter at three positions using the micrometer. If any of the measurements are out of specification, replace the piston pin.
Special tool
 (c): 09900–20205 (micrometer (0 – 25
mm))
Piston pin o.D.
Service limit: 14.980 Mm (0.5898 In)
 Piston ring removal and installation
Removal
Remove the piston. Refer to “engine bottom side disassembly” .
Carefully spread the ring opening with your thumbs
and then push up the opposite side of the 1st ring to
remove i ...
 Balancer shaft disassembly and assembly
Refer to “engine bottom side disassembly” (page 1d-
49).
Refer to “engine bottom side assembly” .
Disassembly
Remove the balancer shaft. Refer to “engine bottom side disassembly” .
Re ...
Other materials:
Special tools and equipment
Recommended service material
Note
required service material is also described in the following.
“Throttle body components” “engine bottom side assembly”
Special tool
...
Throttle body inspection and cleaning
Refer to “throttle body disassembly and assembly” .
Cleaning
Some
carburetor cleaning chemicals,
especially dip-type soaking solutions, are
very corrosive and must be handled carefully.
Always follow the chemical manufacturer’s
instructions on proper use, handling and
sto ...
Fuel level gauge inspection
Inspect the fuel level gauge in the following procedures:
remove the fuel pump. Refer to “fuel pump disassembly and assembly” in
section 1g .
Measure the resistance at each fuel level gauge in
float position. If the resistance is incorrect, replace
fuel level gauge with a ne ...