Suzuki GSX-R 1000 Service Manual: Cam chain tension adjuster inspection
The cam chain tension adjuster is maintained to proper tension automatically.
- Remove the cam chain tension adjuster. Refer to “engine top side disassembly” .
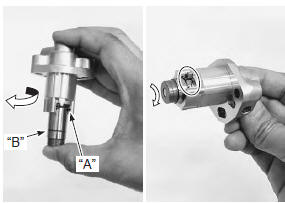
- Holding the cam chain tension adjuster as shown in the figure, compress the plunger by turning the adjuster body until the outer circlip “a” reaches the groove “b”.
- Hook the outer circlip “a” into the groove “b”, then turn the plunger head clockwise more than 90° to make a little play in the inner thread mechanism.
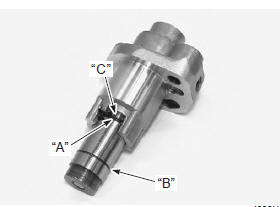
| Note if it is difficult to compress the plunger because of internal engine oil, disassemble the adjuster by releasing the inner circlip “c” and spill out the oil. |
| Caution do not turn the adjuster body until the outer circlip “a” exceeds the groove “b”. If the inner circlip “c” is caught in the groove “b”, plunger may not go out automatically from the adjuster body even if pushing force is applied on the head. In such case, it needs to be disassembled. |
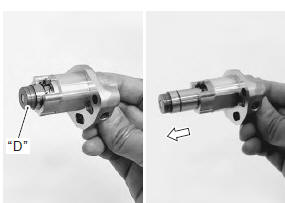
- Check that the plunger goes out automatically when its head “d” is tapped. If it does not work smoothly, replace the cam chain tension adjuster with a new one.
- Install the cam chain tension adjuster. Refer to “engine top side assembly” .
 Camshaft sprocket
Inspect the camshaft sprocket in the following
procedures:
remove the intake and exhaust camshafts. Refer to “engine top side
disassembly” .
Inspect the teeth of each camshaft sp ...
 Cam chain guide / cam chain tensioner
removal and installation
Cam chain guide / cam chain tensioner
removal and installation
Removal
Remove the cylinder head cover. Refer to “engine top side disassembly” .
Remove the cam chain guide no. 2 (1).
Remove the cylinder head. Refer to “engine top side disasse ...
Other materials:
Fuel and oil recommendation
Fuel (for USA and Canada)
Use only unleaded gasoline of at least 90 pump octane
(r/2 + m/2).
Gasoline containing mtbe (meltyl tertiary butyl ether),
less than 10% ethanol, or less than 5% methanol with
appropriate cosolvents and corrosion inhibitor is
permissible.
Fuel (for other countries) ...
Oil pump removal and installation
Note
be careful not to drop any parts into the
crankcase.
Removal
Remove the oil pan, oil pressure regulator and oil strainer. Refer to
“oil pan / oil pressure regulator / oil strainer removal and installation” .
Remove the oil pump driven gear bolt (1).
Rem ...
Clutch adjustment
Clutch cable play should be 1 0 -
15 mm (0.4 - 0.6 In) measured at
the clutch lever end. Adjust clutch
cable play according to the following
procedure:
Minor adjustment
Turn the clutch cable adjuster 1
to provide the specified play.
Major adjustment
Turn in the adjuster 1 all the ...