Suzuki GSX-R 1000 Service Manual: Exhaust control valve inspection
Inspect exhaust control valve initially at 1 000 km (600 miles, 2 months) and every 12 000 km (7 500 miles, 24 months) thereafter
Inspect exhaust control valve as follows:
- remove the left side cowling. Refer to “exterior parts removal and installation” in section 9d .
- Check the exhaust control valve actuator (1) for its smooth movement when the ignition switch is turned on. If the exhaust valve actuator does not move smoothly, check exhaust valve actuator electrical circuit. Refer to “excva inspection” in section 1k .
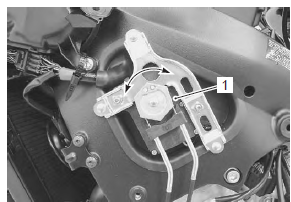
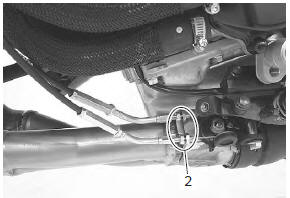
- Check the lock-nuts (2) for tightness. If the lock-nuts (2) are loose, tighten them after adjusting the cable length. Refer to “excv cable removal and installation” in section 1k .
 Exhaust pipe bolt and muffler bolt inspection
Tighten exhaust pipe bolts and muffler bolts
initially at 1 000 km (600 miles, 2 months) and every
12 000 km (7 500 miles, 24 months) thereafter
Check the exhaust pipe bolts and muffler bolts to th ...
 Valve clearance inspection and adjustment
Inspect valve clearance
initially every 24 000 km (14 500 miles, 48 months)
Inspection
Valve clearance adjustment must be checked and
adjusted, a) at the time of periodic inspection, b) when
the ...
Other materials:
Precautions
Precautions for clutch system
Refer to “general precautions” in section 00 (page 00-1).
Schematic and routing diagram
Clutch cable routing diagram
Refer to “throttle cable routing diagram” in section 1d .
Diagnostic information and procedures
Clutch system symptom diagnosis
...
Rear wheel removal
Place the motorcycle on the
side stand.
Remove the cotter pin 1.
Remove the axle nut 2.
Warning
A hot muffler can burn you.
The muffler will be hot enough
to burn you for some time after
stopping the engine.
Wait until the muffler cools to
avoid bur ...
Schematic and routing diagram
Cooling circuit diagram
Water hose routing diagram
Thermostat air bleeder hole
Cushion
O-ring
Radiator heat guard
: be careful not to damage the pawls when removing.
Yellow
marking
White
marking
Clamp end
should face downward
...