Suzuki GSX-R 1000 Service Manual: Engine stop switch inspection
Inspect the engine stop switch in the following procedures:
- turn the ignition switch off.
- Remove the air cleaner box. Refer to “air cleaner box removal and installation” in section 1d .
- Disconnect the right handlebar switch coupler (1).
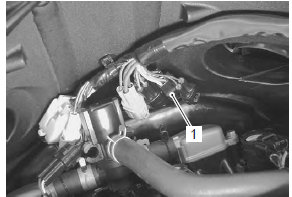
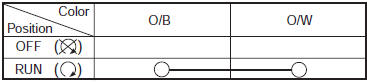
- Inspect the engine stop switch for continuity with a tester.
If any abnormality is found, replace the right handlebar switch assembly with a new one. Refer to “handlebar removal and installation” in section 6b .
Special tool
 : 09900–25008 (multi circuit tester
set)
Tester knob indication
continuity (  )
)
- After finishing the engine stop switch inspection, reinstall the removed parts.
Ignition switch inspection
Refer to “ignition switch inspection” in section 9c .
 Ckp sensor inspection
Refer to “electrical components location” in section 0a .
Ckp sensor peak voltage
Lift and support the fuel tank. Refer to “fuel tank
removal and installation” in section 1g (page 1g-
9).
D ...
 Ignition switch removal and installation
Removal
Remove the air cleaner box. Refer to “air cleaner box removal and
installation” in section 1d .
Disconnect the ignition switch lead wire coupler (1).
Disconnect the immo ...
Other materials:
DTC “c28” (p1655): secondary throttle
valve actuator (stva) malfunction
Detected condition and possible cause
Detected condition
Possible cause
The operation voltage does not reach the stva.
Ecm does not receive communication signal from the
stva. Stva can not operate properly or its motor locked
Stva malfunction.
...
Inspecting the drive chain
When inspecting the chain, look
for the following:
loose pins
damaged rollers
dry or rusted links
kinked or binding links
excessive wear
improper chain adjustment
If you find anything wrong with the
drive chain condition or adjustment,
correct the pr ...
Fuel pressure inspection
Keep away from fire or spark.
Spilled gasoline should be wiped off
immediately.
Work in a well-ventilated area.
Inspect the fuel pressure in the following procedures:
lift and support the fuel tank. Refer to “fuel tank removal and
installati ...