Suzuki GSX-R 1000 Owners Manual: Spring pre-load adjustment
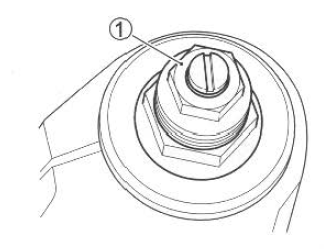
To change the spring pre-load, turn the adjuster 1 clockwise or counterclockwise. Turning the adjuster clockwise will increase the spring pre-load. Turning the adjuster counterclockwise will decrease the spring pre-load.
There are five grooved lines on the side of the adjuster 1 for reference.
Position 5 provides the minimum spring pre-load and position 0 provides the maximum pre-load. This motorcycle is delivered from the factory with its adjuster set on position 4.


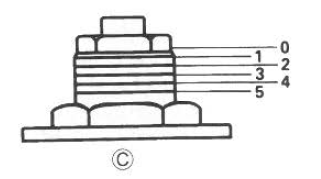
- Position 0
- Position 4
- Position 5
 Front suspension
...
 Damping force adjustment
The rebound and compression
damping force can be individually
adjusted by turning the respective
adjusters. The rebound damping
force adjuster 2 is located at the
top of the front fork. The compr ...
Other materials:
Cushion lever removal and installation
Removal
Remove the right side cowling and side frame covers. Refer to “exterior
parts removal and installation” in section 9d .
Support the motorcycle with a jack to relieve load on
the cushion levers.
Remove the left muffler and muffler chamber heat guard no. 2. Refer to
...
Special tools and equipment
Recommended service material
Note
required service material is also described in the following.
“Clutch control system components” “clutch components”
Special tool
...
Engine components removable with the
engine in place
Engine components which can be removed while the engine is installed on the
frame are as follows. For the installing
and removing procedures, refer to respective paragraphs describing each
component.
Center of engine
Item
Removal
Inspection
Installation
...