Suzuki GSX-R 1000 Service Manual: Conrod crank pin bearing inspection and selection
Refer to “engine bottom side disassembly” (page 1d- 49).
Refer to “engine bottom side assembly” .
Inspection
- Inspect the bearing surfaces for any signs of fusion, pitting, burn or flaws. If any, replace them with a specified set of bearings.
- Place the plastigauge axially along the crank pin, avoiding the oil hole, as shown in the figure.
Special tool
 (a): 09900–22301 (plastigage (0.025
– 0.076
Mm))
- Tighten the conrod cap bolts to the specified torque, in two stages.
Note
|
Tightening torque conrod cap bolt: 37 n·m (3.7 Kgf-m, 26.5 Ib-ft) then turn in 1/6 (60°) turn
- Remove the conrod cap bolts and measure the width
of the compressed plastigauge using the envelope
scale. This measurement should be taken at the
widest part of the compressed plastigauge.
If the oil clearance exceeds the service limit, select the specified bearings from the bearing selection table.
Special tool
 (a): 09900–22301 (plastigage (0.025
– 0.076
Mm))
Conrod big end oil clearance standard: 0.040 – 0.064 Mm (0.0016 – 0.0025 In)
Conrod big end oil clearance service limit: 0.080 Mm (0.0031 In)
Selection
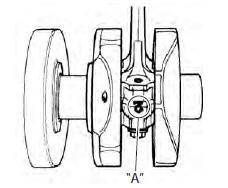
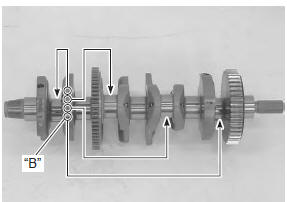
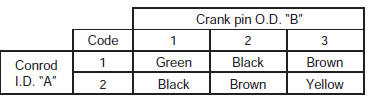
- Check the corresponding conrod i.D. Code numbers ([1] or [2]) “a”.
Conrod i.D. Specification
- Check the corresponding crank pin o.D. Code numbers ([1], [2] or [3]) “b”.
- Measure the conrod crank pin o.D. With the special tool. If any of the measurements are out of specification, replace the crankshaft.
Crank pin o.D. Specification
Special tool
 (a): 09900–20202 (micrometer (25 –
50
mm))
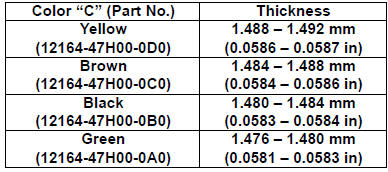
- Select the specified bearings from the bearing selection table.
| Caution the bearings should be replaced as a set. |
Bearing selection table
Bearing thickness specification
|
 Conrod and crankshaft inspection
Refer to “engine bottom side disassembly” (page 1d-
49).
Refer to “engine bottom side assembly” .
Conrod small end I.D.
Measure the conrod small end inside diameter using the
small bore gauge.
...
 Crankshaft journal bearing inspection and
selection
Crankshaft journal bearing inspection and
selection
Refer to “engine bottom side disassembly” (page 1d-
49).
Refer to “engine bottom side assembly” .
Inspection
Inspect each upper and lower crankcase bearing for
any damage.
Set ...
Other materials:
Light bulb replacement
The wattage rating of each bulb is
shown in the following chart.
When replacing a burned-out
bulb, always use the same wattage
rating according to the following
chart.
Caution
Using a light bulb with the
wrong wattage rating can
cause electrical system damage
or shorte ...
Evaporative emission control system
diagram (only for e-33)
Fuel tank
Fuel-vapor separator
Fuel pump
Fuel feed hose
Fuel shut-off valve
Iap sensor
Surge hose
Evap canister
Purge hose
Evap system purge control solenoid valve
Fue
Hc vapor
Fresh air
Vacuum
...
Location of parts
ciutch lever
left handlebar switches
indicator lights
tachometer
ignition switch
front brake fluid reservoir
right handlebar switches
throttle grip
front brake lever
fuel tank cap
front suspension spring pre-load and rebound damping
force ...